https://couponspreview.com/blogs/feed.atomCoupons Preview - Feed2023-06-30T21:13:51-04:00Coupons Previewhttps://couponspreview.com/blogs/feed/it-s-easy-to-make-gears-out-of-wood2023-06-30T21:13:51-04:002023-06-30T21:13:51-04:00It’s Easy To Make Gears Out Of Woodadmin
Typically, most of the gears we use in our life are made of plastic or metal. However, wood gears can do just fine in some simple roles, and they’re utterly pleasant to make, as this video from [botto bie] demonstrates.
With steady hands, it’s easy to make basic gears by hand with basic tools and a printer. You just need the help of a spur gear generator to produce the required outlines for you to follow. [botto bie] uses the online tool from Evolvent Design which will spit out DXF or SVG files as you desire.
Basic woodworking techniques are used to produce the gears, and they prove simple and effective. A rack is produced by first applying a involute tooth template with paper to a rectangular piece of wood. A series of circular and table jigsaw operations are then used to cut out the required material to produce the rack. A variety of toothed gears are produced in a similar fashion.
If you’re lacking a CNC machine or a 3D printer, this can be a great way to experiment. Bonus points if you use your wooden geartrain as part of some kind of exciting mechanism, like an automated marble run or musical contraption. Video after the break.
]]>
https://couponspreview.com/blogs/feed/how-to-build-a-picnic-table-8-steps-to-building-a-farmhouse-table2023-06-30T15:13:51-04:002023-06-30T15:13:51-04:00How To Build a Picnic Table: 8 Steps to Building a Farmhouse Tableadmin
This post How To Build a Picnic Table: 8 Steps to Building a Farmhouse Table appeared first on Life Storage Blog.
Hosting family and friends at your home, whether it’s for a backyard BBQ or holiday party, is always a blast. But sometimes, ensuring everyone has a place to sit can be a challenge. Add plenty of additional seating by learning how to build a picnic table.
A farmhouse table will look amazing on your deck, patio, or even on the grass. This table will boast seating for up to eight people. You won’t need to use a storage unit to stow away extra seating as this table look stunning as outdoor decor.
For this project, you will need:
Exterior screws (1 ¼ inch and 2 ½ inches)
4–inch TimberLok screws (black)
(11) 2x6x8 boards
(2) 2x12x8 boards
(1) 2x10x8 board
Tape measure
Table saw
Jigsaw
Circular saw
Wood glue
Chisel
Drill
Hand sander and sandpaper
Wood stain and polyurethane combo in Classic Black
Rag
Plastic gloves
Drop cloth
Painters tape
White outdoor paint
Roller paint brush
Vinyl numbers or number stencils (optional)
Remember to wear eye and eye protection as you work, and be cautious when using power tools.
How much does it cost to build a picnic table?
If you follow the same sizing outlined in the steps, it will cost between $200–$250 to build a DIY picnic table. For the size, the cost is rather affordable and can be enjoyed for years to come. The price may vary slightly depending on the size you need and the paint you choose.
What is the best wood to use for a picnic table?
For an outdoor table, pressure-treated boards are a good choice as the lumber is durable, easy to stain, durable, and low-cost. Hardwood is another popular option. Depending on your budget, you can splurge for cedar or cypress boards.
For this project, we’ll be creating a 6-foot table. Sand all your wood pieces before assembling, paying special attention to the top of the table. It should be nice and smooth. Cut six 2×6 boards to 6 feet long and lay them out on the ground.
You can customize the size of your farmhouse table as desired. Simply adjust the measurements to suit your needs.
PRO TIP: Be extremely careful when picking out your lumber for this project. You don’t want warped boards, huge knots, or boards with splits. Dig through the lumber to search for the best pieces.
Step 2: Stain Your Tabletop
It’s best to stain the top of your table before putting all the pieces together. Stain each of my boards separately. We recommend wearing rubber gloves, using an old rag and rubbing the stain into the board. Use two coats of stains for the boards and let them dry for 6 hours between coats.
Step 3: Build Your Table Legs
While waiting for the stain to dry, you can start building the legs. The legs are the only tricky part of this whole project. The legs are made from a 2×6 board and cut to 31 ½ inches long. You’ll need four of these cut-out. On the ends of your boards, cut them all to a 32° angle.
Lay your boards across each other and mark where they overlap with a pencil. Use a hand saw to cut shallow grooves and a chisel to remove the wood. Essentially, you’re cutting out two spots to allow the leg pieces to fit perfectly.
Then, glue the legs together with wood glue. Once that dries, the bond will be permanent.
Step 4: Attach Your Table Braces and Legs
Next,you’ll make three table braces. Two of the three will go on each end. To make these two, cut a 2×6 board in half and trim them to 32 inches long. Angle the ends to 32° angles. For the middle brace piece, cut a 2×6 board to 32 inches long with angled ends.
Lay your tabletop on the ground, have one person hold the boards together securely, and have another person attach the braces with a drill and wood screws. Attach the two end braces first, then attach your middle brace. Use two screws per tabletop slat.
You may have to predrill holes and use a drill bit extended to get the screws into the tabletop for the two end pieces. Next, to attach the legs, screw them into the table braces on either end with wood screws.
Step 5: Attach Your Long Brace Piece
The brace piece that runs between the two leg pieces is a 2×6 board cut to 5 feet in length. Place this piece as close to the middle of the X as possible and screw in using the 4–inch TimberLok screws. Have one person hold the board up while the other person screws it in with a drill.
PRO TIP:Because you’ll be able to see the screws on top of the table, we suggest TimberLok because they have a decorative black head. This looks much prettier than a plain old screw.
For the legs of the bench, use a 2×10 board cut to 16 ½ inches. You’ll need 4 of thesecut-out. If you want to make it a little fancier, cut a half circle out of the bottom with a jigsaw.
For the bench seat, use a 2×12 board cut to 6 feet long. You’ll need two of these. The two braces – one for each bench – are made out of a 2×6 board cut to 5 feet long pieces.
First, screw in your legs on both ends. Screw them in at an angle from the inside so no screw holes will be visible. Then, attach the brace the same way you did for the table using the 4–inch TimberLok screws.
PRO TIP: Use a scrap piece of a 2×6 board to hold it in place as you screw it in. This makes it easy to attach it in the same exact spot on both sides. You can also use scrap pieces of lumber to hold the bench off the ground as you work so your benchtop doesn’t get scratched.
Step 7: Paint Your Table Legs and Benches
You can paint your legs or benches whichever color you’d like. Whitewood picnic tables are a popular farmhouse style, so that would be a good option if that’s the look you’re going for.
You can choose to stain or paint the table, but you want to do either one. Leaving your table as-is could result in damage over time. Use exterior stain or paint to keep your table protected from the elements.
Step 8: Add Numbers to the Benches
One of the hallmarks of farmhouse style is numbers, so you can choose to add black vinyl numbers to both your benches.You can cut your own vinyl using a digital craft cutter, use stencils and paint, or order vinyl lettering online. Black lettering works well as it ties nicely into the exposed black screws on the tabletop.
How long will a picnic table last outside?
If you properly care for your picnic table by keeping it clean and staining it, you can get up to 10 years out of it. Around that time, the boards may need to be replaced due to weather damage or warping.
Now, you have a lovely seating area to entertain guests. The picnic table and benches will prove useful for years to come as you make lasting memories with those close to you.
This post originally appeared on the Life Storage Blog on 9/26/16 and was revised on 6/30/23 to provide new information.
]]>
https://couponspreview.com/blogs/feed/frosthaven-a-bigger-better-cooler-gloomhaven2023-06-30T09:13:52-04:002023-06-30T09:13:52-04:00‘Frosthaven’: A Bigger, Better, Cooler ‘Gloomhaven’admin
Your band of mercenaries has made it to the far north, a small outpost called Frosthaven in the Frozen Wastes. What adventures await you here?
What Is Frosthaven?
Frosthaven is a legacy-style cooperative game for 1 to 4 players, ages 14 and up, and is the sequel to Gloomhaven. The play time varies by scenario, roughly 2 hours per session but this can be affected by the number of players, the complexity of the particular scenario, and some other factors. Frosthaven was originally funded through Kickstarter in 2020, delivered to backers in late 2022 and early 2023, and is now available to purchase from Cephalofair Games, with a price tag of $250 (or more, if you want to bundle some of the extras with it). Or if you don’t mind waiting a bit longer, you can pledge $180 for the second printing of Frosthaven through the current Backerkit campaign. Frosthaven is a standalone game and you don’t need to play Gloomhaven first, though it uses a lot of the same rules, with a few new additions.
Frosthaven was designed by Isaac Childres and published by Cephalofair Games, with artwork by Francesca Baerald, David Demaret, Alexandr Elichev, and Josh T. McDowell. There’s also a host of additional names in the rulebook for developers, scenario writers, graphic design, and more—too many for me to list here.
What Is a Legacy-Style Game?
The term “legacy game” has been around for over a decade now (starting with Risk Legacy) but I find it’s still helpful to clarify what I mean, especially if you haven’t played one yet. Legacy games are games in which you will make permanent changes to the game as you play, often as a result of decisions you make over the course of the game. Nowadays, this can include writing on or adding stickers to game components, tearing up cards, scratching off some coating to reveal hidden information, and more. In most cases, legacy games are also campaign games, which means you’re intended to play through some number of sessions before you “complete” the game—at which point the particular state of your copy of the game is the “legacy” that you and your fellow players have created, potentially unique from any other copy that has been played.
There are a lot of components in Frosthaven that are revealed as you reach certain parts of the story, stickers that are added to the map, and so on, and the element of surprise as you open an envelope or lift a flap is part of the appeal. Because of that, it’s hard to talk in detail about the game, especially the components themselves, without giving a few spoilers. That said, I’ll try to keep significant spoilers to a minimum and only share what’s really necessary for explanation—primarily I’ll show photos from the first scenario so that they’re things you’d see very early on.
That’s a whole lot of cardboard to punch out. Photo: Jonathan H. Liu
Frosthaven Components
Because of the hidden/unknown components, I’ll list the “known” contents of the box but will leave out some of the details. When you first open the huge box, you’ll find a big stack of cardboard to punch out, and underneath that are a few plastic trays of cards, envelopes, boxes, books, and some other materials. There’s a handy sheet that tells you how to get things sorted to some extent, though there are some things that you’ll need to further organize yourself.
Here’s what comes in the box:
Map board
Scenario book
Section book
38 Map tiles
225 Overlay tiles
Alchemy chart
Campaign sheets
6 Sticker sheets
Puzzle book
5 Scenario flowcharts
327 Monster standees
17 Sealed envelopes
Element board
Round marker
6 Element tokens
18 Character miniatures
17 Character tuckboxes
4 Reference cards
29 Building cards
10 Personal Quest cards
24 Random Room cards
24 Random Setup cards
247 Event cards
379 Item cards
25 Random Item cards
15 Random Item Blueprint cards
60 Battle Goal cards
59 Loot cards
7 Random Scenario cards
45 Challenge cards
344 Monster Ability cards
55 Town Guard cards
165 Attack Modifier cards
13 Divider cards
49 Monster Initiative Order tokens
25 Scenario Aid tokens
32 Boss Stat cards
48 Monster Stat cards
6 Monster Stat sleeves
4 Character dials
30+ Plastic bases
60+ Damage tokens
20+ Loot tokens
100+ condition tokens
Each map tile is double-sided. Photo: Jonathan H. Liu
First up, there are a lot of map tiles—these have notches and knobs on the edges so that they can attach to each other, jigsaw-style, and each tile is double-sided so you get different artwork for the background. They’re labeled with numbers and letters, so all of the tiles of the same shape share a number. There isn’t an organizer for these included in the base box, so they just get piled on top of the trays.
The Frosthaven trays. Photo: Jonathan H. Liu
The photo above shows the plastic trays: the two on the left nest into each other (with lids); the top one includes all the various status token and damage tokens, and the larger tray has all of the overlay tiles for terrain, doors, special locations, and so on.
The tray on the top left has most of the cards: lots of event cards, battle modifier cards, and item cards. Most of these have little divider cards to separate the available and unavailable cards, but the way they’re designed is that “Available” is printed on one side and “Unavailable” is printed on the other, so you need to be careful which side you’re looking at. This tray also included all of the cards for the enemies (in that empty well on the right), but the way the game has you organize them (see below), this well ends up empty. One thing that disappointed me about the divider cards is that the tabs stick up over the height of the trays—and for storage, you’ll pile the books and tiles on top of them, which means the tabs get squashed. There was an article about how they hired a submarine engineer to get everything to fit into the box—and it’s an impressive feat, for sure, but a lot of it feels like it fits when it’s new, but isn’t designed for good storage once everything is punched out and in use.
The large tray on the bottom is intended to be left at the bottom of the box. It has the health/XP dials, large enemy cards, building cards, a bunch of sealed envelopes, and then lots of boxes. The smaller boxes along the right are miniatures for all of the player characters, and the flat boxes are the other components for each of the character classes.
Banner Spear components. Photo: Jonathan H. Liu
Each class has its own set of components so they vary a bit, but the photo above shows is a sample. The Banner Spear is one of the starting classes (and the one I started with). Each box has a player board, a pad of character sheets, a deck of action cards and a deck of modifier cards, an initiative token, and potentially some other tokens. The Banner Spear has a lot of abilities that summon allies or banners, but some characters have none or have other types of tokens. The character itself has a corresponding miniature, but there are also cardboard tokens for each character in case you prefer to use those instead.
“Organizing” the monster tokens. Photo: Jonathan H. Liu
The bulk of the cardboard punchouts are the enemies. There are over 40 monsters, demons, guards, machines, and creatures, and there are 6 to 10 copies of most of them aside from the bosses. If you have Gloomhaven, you’ll notice that there are quite a few that you’ve seen before. Each enemy has the standee tokens, an initiative banner, and a small deck of action cards, and the setup sheet tells you to bag these up (with the included plastic baggies) and then, well, pile them all into the box, on top of the stacks of map tiles. While this does get everything to fit in the box, it’s a pretty poor system, particularly when you’re looking for specific enemies for a scenario setup. I ended up labeling all the bags with a marker and lining them up in a shoebox in alphabetical order.
The board, stickers and sheets, books, and scenario flowcharts. Photo: Jonathan H. Liu
There’s a large board that serves as a map—it has the Northern Coast on the top half, and then a close-up of the Frosthaven outpost on the bottom. You get a pad of campaign sheets, a few sticker sheets (which you aren’t supposed to examine too closely), an alchemy chart, a few books, and scenario flowcharts, plus a little sealed puzzle book.
In case you’re already familiar with Gloomhaven, the rules and sections that are new to Frosthaven are highlighted so you can quickly skim to find the new material. This time, in addition to the scenario book, there’s also a section book. In Gloomhaven, I noted that although you weren’t supposed to know what was on the other side of a door until you open it, it was easy to glance at the setup map and see what was coming. Now, the scenario setup shows you the whole map layout but only includes monsters in the rooms you can see at the start of a scenario, with instructions to look up a particular page in the section book when you open a door (or other events trigger). The section book is also where you’ll find timed events or sometimes the results of decisions you make.
The Frosthaven scenario flowchart shows you which scenarios are available. Photo: Jonathan H. Liu
The scenario flowcharts are large sheets that show how one scenario leads into the next. Some are linear paths, and other times there are branching paths that you’ll take depending on the outcome of a scenario. There are scenarios that will unlock after a certain amount of time has passed, and there are others that you can’t play until you’ve made enough progress in the puzzle book.
The scenario sticker for the starting scenario. Photo: Jonathan H. Liu
As you unlock scenarios, you open the flap on the flowchart, which reveals a sticker to put onto the board. The location coordinates are listed on the board, though it would have been nice to have it printed on the margin of the sticker too. The board itself just has the numbered circles, and when you place a sticker it will add the scenario title, as well as some more illustrations about that scenario. There will even be times when you place stickers on top of other stickers. Some stickers overlap the sections of the board that fold, and those stickers are cut into two pieces, but I’ve found that the cuts don’t always line up exactly right.
The top half of the board, showing the Northern Coast, where you’ll be adding scenario stickers. Photo: Jonathan H. LiuThe bottom half of the board shows the Frosthaven Outpost, where you will add buildings and walls. Photo: Jonathan H. Liu
The Outpost section of the board starts with a few buildings, but the walls are incomplete and most of the outpost consists of empty lots. As you play through the campaign and build up the prosperity level of the outpost, you’ll be able to level up existing buildings and build new ones, giving you access to stronger abilities. The building stickers stack as you level them up, and it’s fun to see the little details that are added as each one is improved.
What’s behind this door? Wolves! Photo: Jonathan H. Liu
How to Play Frosthaven
Since the core of the gameplay in Frosthaven is the same as Gloomhaven, I don’t want to get too bogged down in the mechanics here. You can read my review of Gloomhaven for a more detailed breakdown, and I’ll mostly highlight the differences here.
Setup for the first scenario of the campaign. Photo: Jonathan H. Liu
A quick sketch of the gameplay: each scenario has its own setup map, enemies, and various terrain features placed on the map according to the scenario book, and some have special rules as well. Each player has a hand of action cards that each have a top action and a bottom action—typically attack on the top and movement on the bottom, but this can vary greatly from character to character. On your turn, you choose two cards from your hand to play—this will determine both the initiative order for the players and give you the options for your turn. Each monster type on the board will also flip a card from their individual decks, which will determine their initiative and dictate their behavior.
When it’s your turn, you choose one of your cards to use the top action, and the other card uses the bottom action, moving around the map and (usually) attacking the enemies. Some cards—usually the more powerful actions—will be “lost” after you use them, meaning they’re unavailable for the rest of the scenario, but otherwise they go into a discard pile. If you run out of cards in your hand, you’ll have to rest to get the cards back from your discard, but you also lose a card when you rest—that means you have a limited number of turns before you have no more cards available and are exhausted, out of the scenario.
You also have a limited amount of health, which ticks down when you take damage—and, of course, if you run out of health, you’re exhausted for that scenario. You’re also allowed to lose cards to prevent damage, but that runs you out of cards sooner, so you need to maintain a careful balance between losing health and losing cards. Each scenario has its own objectives (defeat all enemies, last a set number of rounds, destroy a particular object) and loss conditions.
Battle goals help you earn perks to improve your character. Photo: Jonathan H. Liu
In each scenario, you’ll also have a battle goal—this will earn you checkmarks toward perks if you complete them, and they’re a bit like achievements: have more or less loot, kill a certain number of enemies, always move at the top speed, that sort of thing. Gloomhaven came with 24 battle goals; Frosthaven has more than double that. Perks will usually let you adjust your battle modifier deck or unlock a few other abilities.
As you earn XP, you’ll get to level up your character, which increases their starting health, gives you a perk, and lets you add a new card to your deck. (However, your hand size does not increase, so that means you’re swapping out a card for a more powerful card.) Each player has a secret personal challenge that serves as a long-term goal—if you complete the challenge, then your character retires and you start a new character.
What’s New in Frosthaven
Some of the changes are mostly variety: a few new conditions, terrain types, and a new way to gain loot that uses a deck of cards tied to the scenario itself. There are also some changes to the way line-of-sight is calculated and a few new types of actions.
Event cards can be winter or summer, road or outpost. Note: the text on these is tiny! Photo: Jonathan H. Liu
One change is that the events now have seasons. Usually, at the start of each scenario, you’ll draw a road event, a bit of story that gives you some options, and then you flip the card to see the result of your choice. Now, you’ll draw either a winter road event or a summer road event, depending on the season according to your campaign sheet calendar.
The Campaign sheet has a calendar, shared resources, and various other records of your campaign. Photo: Jonathan H. Liu
The biggest change, though, is the Outpost phase. After most scenarios, your party returns to the Frosthaven Outpost. Each time this happens, you first mark off the next box in the calendar—some of these have section numbers pre-printed on them, and sometimes there will be section numbers that you’ve been instructed to add based on events or scenarios. When you reach one of these, you read that section of the book and resolve the outcome.
Then, you draw an Outpost event card (again, based on the season). Like the road events, these have a bit of story and some options to choose from, but they’re usually a different type of event that has some effect on the outpost rather than the scenario you’re about to play. They also include attacks on your outpost, which can damage or wreck your buildings, and these are resolved with a town guard deck that is similar to your character’s battle modifier deck.
Frosthaven building cards. Photo: Jonathan H. Liu
Each building in your outpost has a corresponding card, and you’ll have an opportunity to use them after resolving the event. For instance, you may be able to buy resources, train soldiers, or brew potions. If a building is damaged or wrecked, you have to pay resources to repair them, and you lose their effects until they’re repaired. Upgrading a building will require you to be at a particular prosperity level, and you’re generally limited to building or upgrading one thing each Outpost phase.
Your campaign sheet also tracks things like your morale (which can be spent for repairs or extra building), your soldiers (used to boost defense during an attack), and shared resources. Just like your character can earn perks to tweak your battle modifier deck, the town guard also has perks to modify the town guard deck—though my party hasn’t gotten to that stage yet! There’s also a section at the bottom of the sheet to record when a character retires—by fulfilling their personal quest.
The Outpost phase is also when you’ll be able to craft items, buy items, brew potions, and level up characters when applicable.
When I wrote up Gloomhaven several years ago, I was still in the middle of another campaign game so it was hard to set up a regular group to play it, and I’ll admit that I did not manage to make it very far, though I still have plans to get back to it eventually if I find the right group for it. This time around, though, I’m playing Frosthaven with two friends who did complete Gloomhaven themselves, and their enthusiasm and consistency mean we’ve already gotten further into the campaign than I did before. We’ve logged 20 sessions so far as of this writing, and I’ve even managed to retire my first character.
What I said about Gloomhaven still holds true for Frosthaven, but more so. It’s even more expensive and even bigger (both in box size and in scope). There are 137 scenarios on the flowchart, and while you won’t play all of them because some branches force you to choose one path or another, you’ll still have plenty to do. Each session takes our 3-player group between 2 and 4 hours to complete depending on the complexity, so even playing weekly I imagine this will take over a year to complete, possibly close to two. Even so, whenever we finish a scenario we’re usually itching to play more, and if I didn’t have so many other games in my queue (and, you know, other friends I also want to play games with) it would be tempting to play Frosthaven multiple times a week instead.
I think one of the key things that sets Frosthaven apart from other dungeon crawlers I’ve played is the way the cards function—picking two cards to set your initiative, and then getting to decide how to use those two cards once your turn actually comes up, gives you a couple of challenging choices while retaining some flexibility. The battle modifier cards, used instead of rolling dice, are another interesting feature. You always have the possibility of a critical fail or a critical hit in the deck, but you can modify a lot of the in-between using your perks, so you can tweak the deck to fit your play style.
My gaming group likes Frosthaven so much, they hired somebody to paint the miniatures! Photo: Jonathan H. Liu
I also like the way that characters retire and change out over the course of the campaign. Some quests take longer than others, but it also keeps things fresh for the players. As you play, you unlock new classes to try out, but even if you go back and play one of the previous classes, you could choose different action cards when you level up—and that’s not even considering the way you can modify the cards themselves with enhancements.
The game’s difficulty level feels nicely tuned. The scenario’s level is based on the individual levels of the characters, and that affects the monster levels, how much damage traps do, how much gold or XP you earn, and so on. We’ve found that in most scenarios we’re just eking out a victory (or just barely losing), which keeps it thrilling. There have been several times that we thought we weren’t going to make it, but then managed to scrape by, and that’s such a satisfying feeling (and keeps you coming back for more).
The Outpost is a nice addition in Frosthaven—it gives you a feeling of leveling up as a party. Will you build up your walls to add to the defense? Or maybe a boat or a sled so you can access some hard-to-reach scenarios? Or upgrade your Alchemist so you can start brewing more powerful potions? The calendar events are also a nice touch, and I always enjoy it when we’re instructed to write a number a few weeks in the future. What will it be—did our plans work out or will things come back to bite us?
If you like a bit more immersion (or if you don’t like reading out loud yourself), I highly recommend the Forteller narration app ($17.99). The app includes all of the scenarios and sections, as well as the event cards. It’s not just a narrator reading the text—there are voice actors with different accents, atmospheric background noise, and other sound effects. It really adds to the setting, and the app is fairly easy to use. You can hear the prologue above to get a sense of it.
For the gameplay, I also recommend using the free Xhaven Assistant app (iOS and Android). You can connect multiple devices so each person uses their own, or you can share a device. It automatically pulls up the monsters and loot deck based on the scenario, and once you’ve put in your characters and levels, it adjusts the difficulty level. You enter your initiative numbers into the app and hit “draw,” and it draws all of the monster cards and arranges everyone in order, so you don’t have to manually draw (and shuffle) all of the monster action cards and mess with the initiative banners. The app will also track things like the elements, your health and XP, and loot that you’ve collected, and has little pop-up messages for scenario rules like when more enemies are supposed to spawn. We use a combination of the app and the physical tokens, but it speeds up some of the setup and upkeep for the game.
Frosthaven is best suited for a group that can be consistent… and that plays well together. If you find yourselves constantly arguing any time you play a cooperative game, this may cause a little too much friction! (Though given the game’s theme, that might be appropriate behavior for a group of mercenaries.) If you’re able to get together with the same group regularly, there’s an amazing world to explore together.
Currently, Cephalofair Games is running a Backerkit campaign called “Gloomhaven Grand Festival,” which includes a host of related products: Gloomhaven second edition, the Gloomhaven Role-Playing Game, Frosthaven second printing, and various minis sets for Gloomhaven and Frosthaven. It’s a chance to get things at a slightly reduced price compared to retail, and there are lots of livestreams featuring gameplay and interviews in case you want to learn more.
]]>
https://couponspreview.com/blogs/feed/a-sales-tax-holiday-can-help-you-save-on-back-to-school-shopping2023-06-29T15:13:51-04:002023-06-29T15:13:51-04:00A Sales Tax Holiday Can Help You Save on Back-to-School Shoppingadmin
Your state may offer a break on clothing and school supplies, and in some cases, much more
By Mary Beth Quirk, Beth Braverman
We know it may feel like summer’s just getting started. But if you’re already thinking of back-to-school shopping, you may get a price break in the next few months.
While shopping, keep in mind that most states have limits on how much you can purchase without paying taxes. Tennessee, for example, forgives its full 7 percent state sales tax on computers that cost up to $1,500. South Carolina, on the other hand, doesn’t place a dollar limit (PDF) on eligible purchases and even exempts add-ons such as clothing alterations and delivery charges.
In 2022, consumers spent an average of $864.35 on back-to-school shopping according to the National Retail Federation, a trade organization. Depending on where you shop, the savings could really add up.
Connecticut: August 20 to 26 Connecticut’s 2023 tax-free week breaks include certain clothing and footwear that sell for less than $100 per item.
Florida: July 24 to August 6 The back-to-school tax break in Florida applies to learning aids and jigsaw puzzles selling for $30 or less; certain school supplies that sell for up to $50; clothing, footwear, and other accessories that cost up to $100 per item; certain school supplies that sell for up to $50; and the first $1,500 of the sales price of personal computers and some computer-related accessories. You can get more details from Florida’s Department of Revenue (PDF).
Maryland: August 13 to 19 If you need to buy a backpack or book bag, there’s no tax on the first $40. There are also other items covered (PDF), including qualifying clothing and footwear costing up to $100 per item.
Massachusetts: August 12 to 13 Retail items of up to $2,500 purchased in Massachusetts for personal use will be exempt from sales tax. It’s worth noting that if the item exceeds the $2,500 threshold, shoppers will have to pay tax on the full price, not just the amount over that limit. Exceptions to the holiday include cars, gas, telecom services, and others. For more info, check out the Massachusetts Department of Revenue’s guidance.
Mississippi: July 28 to 29 Mississippi’s 2023 sales tax holiday includes qualifying clothing, footwear, and school supplies that sell for less than $100 per item.
Missouri: August 4 to 6 Missouri’s 2023 sales tax holiday applies to clothing that costs up to $100 per item, school supplies up to $50 per purchase, computer software up to $350, and computers and computer accessories up to $1,500.
New Mexico: August 5 to 7 New Mexico’s 2023 sales tax holiday includes qualifying clothing costing less than $100, computers for less than $1,000, computer-related items such as printers and monitors for less than $500, handheld calculators for less than $200, and school supplies for less than $30. Here’s a full list of eligible items from the New Mexico Taxation & Revenue Department site (PDF).
Ohio: August 4 to 6 Instructional materials that your kids may need at school are tax-free as long as they cost $20 per item or less. So are school supplies. Ohio’s 2023 sales tax holiday also includes qualifying clothing that costs up to $75 per item.
Oklahoma: August 4 to 6 Oklahoma’s 2023 sales tax holiday (PDF) includes qualifying clothing and footwear that costs less than $100 per item.
South Carolina: August 4 to 6 If your back-to-school list includes printers, software, bed linens, and even footwear, South Carolina’s 2023 sales tax holiday (PDF) is a good time to make these purchases.
Tennessee: July 28 to 30 Tennessee’s 2023 sales tax holiday includes qualifying clothing that costs up to $100 per item, school supplies up to $200, and computers and tablets up to $1,500.
Texas: August 11 to 13 Texas’ 2023 sales tax holiday includes qualifying clothing, footwear, backpacks, and school supplies costing less than $100 per item.
West Virginia: August 4 to 7 During this year’s sales tax holiday in West Virginia, shoppers won’t have to pay sales tax on exempt items like certain clothing up to $125; laptop and tablet computers up to $500; general school supplies up to $50; and some sports equipment that costs $150 or less.
Product Picks
While you’re preparing to shop, check out some of CR’s top-rated laptops and tablets below.
As an Amazon Associate, I earn from qualifying purchases. Amazon Prices change often and promo codes sometimes end sooner than the Expiration Date. This is the price as of the time I’m writing this post and the promo code worked when I tried it.
If you find a deal or Amazon Promo Codes that are no longer working please let me know so I can remove it.
Most of these deals will ship FREE with Amazon Prime. If you don’t have Amazon Prime, that’s ok you can Try Amazon Prime 30-Day Free Trial to see what it’s all about! If you are a student, you can get a Free 6 Month’s Trial of Amazon Prime Student! Once you try it out, you can cancel before your trial is up and pay nothing if you decide it’s not right for you.
Amazon Weekly Coupon Codes – 6/29/2023 – 7/5/23
Plus Size Two Piece Bathing Suit
60% off code 607EYQ48
Reg. Price $26.59 – $36.99 Final Price $10.63 – $14.79
Code Expires 7/1/23
Electric Candle Lighters
50% off code 506U24IA
Reg. Price $12.99 Final Price $6.49
Code Expires 7/5/23
]]>
https://couponspreview.com/blogs/feed/make-your-own-busy-board-for-toddlers2023-06-28T21:13:50-04:002023-06-28T21:13:50-04:00Make Your Own Busy Board For Toddlersadmin
If you have toddlers at home, this list of DIY busy board ideas will inspire you to make one for them and keep them happily occupied.
12 DIY Busy Boards To Keep Your Toddlers Occupied
‘Busy' takes on a whole meaning when there's a little child in the house. With endless amounts of vitality, curious minds, and fingers that need to jab, pull and prise open almost everything, toddlers simply need to keep themselves busy to satisfy their curiosity (which means moms and dads become even busier entertaining them). Toddlers are the ultimate explorers, eager to learn and play. But on days when you just can't go outside to dig for hidden treasure, these DIY busy boards are an amazing alternative that's safe, educational, and inexpensive to put together.
1. Fabric Busy Board
Tweak those little motor skills with this fabric DIY busy board. Zips, bows, buttons, buckles, and velcro – ooh yeah. If you love sewing, those tiny scraps will now come in handy.
2. DIY Latch Board
With all kinds of latches in a perfectly sized board offer a boundless entertainment for kids. They will have all the fun opening and shutting the latches and hinges. This amazing DIYer even included a few vividly-colored carabiners fastened to some handles to provide extra fun stimulation.
3. Felt Busy Board
Filled with felty goodness! Your famished little caterpillars will have non-stop fun organizing tiny bits of food. With just a few easy-to-find crafting supplies paired with the step-by-step tutorial, you can recreate this busy board in just 15-minutes.
4. Peek-A-Boo Board
Open, close, open, close, have a little clap as kids find family pictures concealed behind the flaps. This peek-a-boo busy board offers long hours of fun guessing who's and what's in the picture. A sure family fun game!
5. Motion Busy Board
WOW! If you want a board that not just opens and shuts but also provides lots of cool stuff to play with, this motion busy board is your perfect project. Test your woodworking skills, and add doors to your own busy board. Teach your toddler some basic skills like opening and closing a door with this busy board.
6. Car Dashboard
Beep, beep, broom, broom and off we go! This car dashboard comes with everything a little learner needs – rear view mirror, fuel gauge, gears, speed, and, of course, a radio for on-road tunes.
A post shared by DIY Projects (@diyprojectsdotcom) on
7. Zipper Board
Simplicity at its best! This zipper board is super easy to make and fun for everyone. Toddlers appreciate zippers because of the sound it creates when it opens and closes. Grab a piece of cardboard, glue, and a couple of vibrant colored zippers. Once your board is done, your little one can easily bring this zipper board from room to room, and it's the right size for easy storage.
8. Busy Board By The Letter
Add your personal touch to make your busy board project even more special. Shape your board into your happy toddler's initial and add a few surprises to make it more fun. If you're handy with a jigsaw, that's an advantage. That's the tool you'll need.
9. Padlock Busy Board
Great things also come in small packages, and this padlock busy board is no exception. Make sure to attach the keys to the board to avoid losing them, or you'll have a very frustrated little one!
10. Peek-A-Boo Sensory Board
Don't throw those empty baby wipes containers away. You've got here a perfect DIY to develop your kid's sensory skills. Any child would love touching all new textures and flipping a cover to open and close.
11. DIY Travel Busy Board
Who says a busy board needs to be stationary? This DIY travel busy board is perfect for every kid who is always on the go, making the long travel hours more fun than ever.
12. Sensory Busy Board
This sensory busy board is great for toddlers and babies because it has the perfect blends of sensory play and other learning activities. Perfect to recreate for the ever-curious toddler at home.
Want to see how to create a busy board? Check out this video from JB Family:
I definitely love these simple ideas for toddlers! They help babies and toddlers with sensory play and fine motor skills development while providing us a couple of minutes of peace and quiet. I do hope your little ones love these as much as mine!
Which DIY busy board ideas are you excited to try? Tell us in the comments below!
Want another cool DIY you can do with your kid? Check out these four ways to make a homemade bubble solution. Make buckets of it and you’ll have an unlimited supply to use anytime the mood strikes!
]]>
https://couponspreview.com/blogs/feed/thread-art-and-graphic-design-freelance-illustrator-for-hire-i-ve-worked-on-several-game-projects-and-projects-with-ravensburger2023-06-28T15:13:50-04:002023-06-28T15:13:50-04:00Thread: Art and Graphic Design:: Freelance Illustrator for hire. I’ve worked on several game projects and projects with Ravensburger.admin
by MortensenGames
Hi, may name is Nathanael. I've been working as a freelance illustrator for almost over 6 years. I've worked on several board game projects and jigsaw puzzles. I appreciate you taking the time to look over my work. I'm currently looking for immediate projects as well as future projects. If you like my art style, please connect with me at: Mortensengames@gmail.com or through my online portfolio https://www.artstation.com/artlanding
Note: I also wanted to put this out there. I'm interested in working for a publisher as an Art Director / Product Manager. I've managed several projects including board games from idea to publication.
See more work at: https://www.artstation.com/artlanding]]>
https://couponspreview.com/blogs/feed/ikea-lack-side-table-26-surprising-ways-to-hack-it2023-06-28T09:13:51-04:002023-06-28T09:13:51-04:00IKEA LACK Side Table: 26 surprising ways to hack itadmin
The IKEA LACK side table is as “IKEA” as it gets. Minimal. Particleboard exterior. “Honeycomb” interior. Easy to assemble.
The IKEA LACK side table (21 5/8″ x 21 5/8″ x 17 3/4″) sells for $16.99. Not too long ago, IKEA started producing a smaller side table (13 3/4″ x 13 3/4″) which goes for $9.99. You can slide the small side table under the larger LACK side table as a set of nesting tables, and save space. The cheap price means a lot of possibilities for IKEA hacks, as we will see later in this article.
IKEA makes this simple side table in various colors, the most common being black, white, and in a wood veneer. Occasionally, IKEA may release limited edition versions in bolder colors and finishes. The side table is part of the LACK range which includes coffee tables, a TV stand, and wall shelves.
The IKEA LACK side table can be used in a multitude of creative ways, some as simple as peel-and-stick contact paper and others needing a little more DIY skills. We’ll explore 26 unique and creative ways to hack and use the IKEA LACK side table in your home. Some, perhaps, in ways you’ve never thought of before.
DIYer Teadelena gives the side table a new look. She dropped the LACK legs and replaced them with another IKEA product — an EKET cube. Assemble the EKET cube and use an adhesive such as Liquid nails to glue the edge of the EKET cube to the underside of the LACK side table. You can also finish the sides of the EKET cube with wood slats or trim if you want to further embellish it.
Inspired by coffee tables she saw, Kate decided to transform the table set to feature elegantly arched legs. She cut out arch shapes from 6mm MDF with a jigsaw. Then, stuck them onto the bottom of the table and the sides of the legs. For the finishing touch, she primed the set with every IKEA hacker’s favorite primer and painted them with Rust-Oleum Furniture Paint. She let the paint dry completely and was done!
If you love this IKEA LACK side table hack but don’t have the woodworking tools for it, here’s an easier table hack using corbels.
Briana’s extensive makeover elevates the square end table into a high-end sculptural side table that looks and feels luxe. To make the round base, she used these round 8″ tubes, cut into 18″ sections. The legs are glued to each other and to the base of the tabletop. Once the glue has cured, she covered the entire table with plaster of Paris. After the plastic has fully set, she sanded it down and sealed it with a few sprays of clear topcoat. The last step is to place it next to the sofa and move on to styling.
4. Make them into accent tables
Youtuber Jorge shows us 2 different bases for the LACK table, turning them into a home decor piece. One has the slatted base recessed below the tabletop. The second has the base going along the top of the table, creating a more robust square coffee table.
We love Mark’s surprising take on the LACK. It goes Art Deco, bordering on maximalism. Mark made the decorative pieces from plywood, cut with a jigsaw. Each piece is then painted in glossy black paint and edged with a metallic paint pen. To match, Mark painted the entire side table with the same black gloss paint. He then used the E-6000 adhesive to glue the decorative panels to the corners of the table.
Get ready to disco with this throwback furniture hack. This IKEA hack is as easy as busting a move on the dance floor. All you need to do is add some mirror mosaic tiles, and voilà! You’ll have a groovy and glamorous mirrored side table fit for a cameo on Saturday Night Fever.
JP Strate figured out an alternative way to assemble two LACK side tables together. The table top from the second LACK goes under the legs. The legs from the second table are shortened and glued together to form a square base for the LACK to sit on. Almost like a floating side table.
Another way to reconfigure the assembly is to shorten the legs, so it looks less cube-like. Add furniture legs of your choice under the table and it will make a lovely modern side table.
8. The TikTok Tile table
TikTok made her do it. The viral tile table caught April’s eye and she just had to try it out for herself. She used 2×2″ tiles, which were just right for the LACK table’s dimensions.
9. Use the side table for extra seating
If you’re in need of extra seating in your living room, try this ottoman hack. Wrap the tabletop in foam and the fabric of your choice. Embellish with nailhead pins if you want to up the glam factor. They also work as a cocktail ottoman, snack table, or display your latest magazines.
10. A rustic coffee table that no one will believe it’s IKEA
What a difference the slab of extra thick stained pine wood makes. When cutting the tabletop, Ad recommends a 1″ overhang on all sides. Center it on the LACK, making sure that the overhang is balanced on all sides. Attach the wood top to the original table via screws from the bottom. And voilà, a rustic IKEA coffee table.
IKEA LACK side table as pet furniture
11. A cat hammock side table
@productdesign.cavc
A student project but it does work. You’ll need to assemble two LACK tables together and add some cute feet if necessary. Then, within the space, hang a cat hammock from the four corners of the table. Cut MDF boards into the shape you want. Then use screws to install them and cover up all 4 sides of the table for kitty privacy. A cozy hideout for your cat.
12. Side table turned indoor dog house
Rather than discarding an old red LACK table, Rafaela turned it into a cute dog house for her pup. She turned the LACK side table upside down and used peel and stick shelf liner to cover up the striking red color. For the covering, she used a roll-on beach mat and a few nails to keep it in place. Pup loves it!
A quick reminder of to-dos before you leave the house. All you need is the top of the IKEA LACK side table, Chalkboard Paint, and picture hangers for this easy DIY chalkboard.
14. As wall art
The LACK’s square dimensions are also great for displaying art. Think of the tabletop as a square piece of canvas, then create as you wish. You can wrap the tops in masking tape like how Mike did. Or use fabric. You can try decals too.
IKEA LACK side table in the Kitchen
15. As a mobile kitchen island
No space for a kitchen island? Stack two of the LACK side tables and secure them to each other. Then, add wheels. There you have it: a mobile compact kitchen island cart.
16. Kitchen island on a budget
Would you believe that this kitchen island is made from 6 IKEA LACK side tables? While the striped plaster boards may look dated, the concept is still as good as new. If you need an affordable renter-friendly kitchen island with lots of storage cubes, this is the DIY project for you.
Not your regular IKEA LACK table hack. Here’s a classy-looking light using the IKEA LACK side tables as a frame for the LED spotlights.
IKEA LACK side table in the bedroom
18. Hack it into a bedside table
Just one LACK may be too low as a nightstand, two LACKs a tad too tall. So here’s how to cut them down to size and have a two-tiered LACK bedside table, with an additional shelf for your knick-knacks.
19. As a headboard
Using a mix of IKEA LACK coffee tables, Kennet made a headboard to span the width of the bed, integrating bedside tables at the end. An all-in-one headboard solution.
IKEA LACK side table in the kids room
20. As a mobile play kitchen
I love this mobile play kitchen by Kristin. It’s compact, can be easily transported from one room to another, yet has everything including the kitchen sink.
21. As a train table
Making a train table is not as hard as it seems. You only need 2 LACK side tables, an activity rug, tracks, and lots of trains!
A classic LACK Rack Hack. If you have lots of audio equipment, you’ll love this sturdy rack with modern style and clean lines.
Try it in the Patio
26. As a lounger
This is not an easy hack. Charles made this from multiple LACK side tables, cut into half and filled with expanding insulation foam, and covered with latex paint (for waterproofing). Then, assembled it into an outdoor lounger. Add a few plush cushions and done.
You may have an IKEA LACK side table or two stashed somewhere, all wobbly or scratched up, don’t throw them out yet. There are always ways to make them into something useful again. And if you do, do share them with all of us.
]]>
https://couponspreview.com/blogs/feed/bankrupt-david-s-bridal-gets-tentative-bid-to-keep-most-stores-open2023-06-27T21:13:51-04:002023-06-27T21:13:51-04:00Bankrupt David’s Bridal gets tentative bid to keep most stores openadminBy Amelia Pollard | Bloomberg
David’s Bridal has received a tentative going-concern bid that would keep more than 190 stores open, spurring optimism that the wedding dress retailer might be able to survive bankruptcy.
The deal would also keep more than 7,000 jobs by staving off mass store closures, lawyers for the company said in a bankruptcy court hearing Tuesday. The bid deadline has been extended to July 3 and a new sale hearing is scheduled for July 14.
“We think the opportunity to save 7,000 jobs and over 190 stores is fantastic for the vendors and the landlords,” Brad Sandler, an attorney representing the company’s official creditor committee, said during the hearing.
Price and precise terms of the offer were not disclosed. David’s entered bankruptcy with nearly 300 stores.
]]>
https://couponspreview.com/blogs/feed/kim-kardashian-opening-first-skims-store-in-los-angeles2023-06-27T15:13:50-04:002023-06-27T15:13:51-04:00Kim Kardashian opening first Skims store in Los AngelesadminBy Kim Bhasin | Bloomberg
Kim Kardashian’s underwear label Skims plans to open its first permanent stores next year as it plots retail expansion in the US and abroad.
Skims is set to debut its first flagship store in Los Angeles in the first half of 2024, followed by a second opening in New York. The 5,000-square-foot shop will be in West Hollywood on Sunset Boulevard near streetwear stores such as Supreme and Kith.
“Kim and I can envision a future where years from today there’s a Skims store anywhere in the world you’d find an Apple store or a Nike store,” said Jens Grede, co-founder and chief executive officer of Skims. “It marks the second chapter.”
Skims began as a direct-to-consumer business in 2019, but it since has dabbled in physical retail through relationships with department stores such as Nordstrom Inc. and Saks Fifth Avenue. In recent months, Skims has opened temporary pop-ups in locations like London’s Selfridges department store and Rockefeller Center in New York.
Executives are looking to open at least four stores next year and speed up expansion once those are in place. They’re considering placing shops in domestic markets that attract regional tourism, including Dallas, Atlanta and Miami.
The company is weighing international flagships as well, after tests in cities like Paris and Hong Kong. On its online shop, 20% of Skims customers are from abroad.
“Our strategy going forward is to open important stores in the world’s most important cities,” Grede said.
Swimwear to underwear
Skims expects to achieve net sales of about $750 million in 2023, up from nearly $500 million last year. So far this year, the business has been trending at 75% year-over-year growth, according to Grede.
Product expansion has boosted that growth, as Skims branched out from its original selection of shapewear bodysuits into categories like pajamas and swimwear. Underwear now accounts for a sizable chunk of its business, and it’s now planning to launch a men’s line in October.
Skims was most recently valued at $3.2 billion in a 2022 financing round, with total funding now at nearly $400 million. Investors include hedge fund Lone Pine Capital and venture firms Thrive Capital and Imaginary Ventures. Grede declined to say if Skims is seeking additional capital at this time.
Kardashian and Grede are interested in one day taking Skims public, but the CEO said there are no short- or medium-term plans for an initial public offering. The company hired a chief financial officer last year.
“Skims deserves to be a public company — when the time is right,” Grede said.
]]>
https://couponspreview.com/blogs/feed/maximizing-classroom-time-efficient-strategies-for-covering-the-u-s-regions2023-06-26T09:13:53-04:002023-06-26T09:13:53-04:00Maximizing Classroom Time: Efficient Strategies for Covering the U.S. Regionsadmin
Do you ever feel like there’s not enough time in the school day to cover everything in your curriculum? It’s a common challenge faced by many third-grade teachers, especially when it comes to teaching comprehensive lessons about the five U.S. Regions. Juggling multiple subjects, meeting educational standards, and ensuring your students remain engaged can sometimes seem impossible. But what if there was a way to make it easier? In this blog post, we will explore some efficient strategies for teaching geography and offer a sneak peek into a resource that could make a huge difference!
The key to efficient teaching lies in prioritization, organization, and student engagement. Here’s how to leverage these three strategies:
Prioritize Essential Information about the U.S. Regions
Identify the most critical information about each of the five regions of the United States that your students must know. These might include the states in each region, typical climate, key natural resources, and important cultural or historical facts.
Think about ways you can integrate close reading with the need to acquire this information. You can save critical classroom time by combining reading and Social Studies so that students get the essential information they need – AND do it during your reading block!
Organize the Structure When Teaching the U.S. Regions
Break down the content into manageable sections. Teach one region at a time and ensure there is a clear and consistent structure in each lesson. This approach helps students predict what’s coming, making the new information more digestible.
Include reading, responding to text, map skills, and vocabulary to make each region a lesson on its own.
Engage Students with Interactive Activities
Avoid telling students about the five regions. Instead, give them engaging activities that allow them to discover the U.S. regions through the activities. This strategy makes the lessons more fun and helps students retain the information.
Third graders love learning about the world around them – so engagement shouldn’t be a problem!
A Stellar Solution: The U.S. Regions Activity Pack
Knowing these strategies is one thing, but finding the resources that make them easy to implement is quite another. That’s where the 5 Regions of the United States Activity Pack comes in.
This meticulously crafted resource is perfect for teaching geography in the 3rd, 4th, and 5th grades. It includes:
Close Reading Passages for all five U.S. regions and an introduction
Detailed Steps for the 1st and 2nd reads
Graphic Organizers for capturing the main idea and key details, and comparing and contrasting the regions
5 U.S. Regions Maps for labeling and note-taking
Fun Vocabulary Jigsaw Puzzle Pieces and Word Wall Words to make vocabulary learning exciting
A Unit Test to assess understanding
How-to-Use Suggestions for both English Language Arts and Social Studies
These components are all designed to address the three strategies mentioned earlier. The resource prioritizes essential information, organizes it with a clear structure, and includes engaging activities for students.
Implementing the 5 Regions of the United States Activity Pack will not only save you precious time but will also ensure that your students get the most out of their learning experience.
Are you eager to make your geography lessons even more engaging? With the right resources and a bit of preparation, teaching about the five U.S. regions can be comprehensive and enjoyable. It’s about working smart, not hard, and making the most of the tools at your disposal. Dive into your next lesson with enthusiasm and inspire your students to learn more about their country without taking up essential classroom time!
The most valuable resource that all teachers have is each other. Without collaboration our growth is limited to our own perspectives.
Robert John Meehan
Want to join my email list?
It’s Easy!
• Get valuable resources and teaching tips delivered straight to your inbox • Exclusive deals and discounts only available to email list subscribers • be the first to know about new products and launches • Share your ideas and feedback with me directly, I love hearing from my readers!
]]>
https://couponspreview.com/blogs/feed/13-still-life-artists-we-re-loving-right-now2023-06-25T21:13:52-04:002023-06-25T21:13:52-04:0013 Still Life Artists We’re Loving Right Nowadmin13 Still Life Artists We’re Loving Right Now
Shopping
by Christina Karras
Leanne Xiu Williams in her studio. Photo – Miki Mikka
‘A Vase With Flowers’ by Leanne Xiu Williams. Photo – Alfonso Chavez-Lujan
‘Cheri Tomatoes’ by Leanne Xiu Williams. Photo – Alfonso Chavez-Lujan
Artwork by Leanne Xiu Williams. Photo – Alfonso Chavez-Lujan
You’d never guess that Sydney-based artist Leanne Xiu Williams is self-taught. After studying art history at university, she was inspired to pick up painting during the pandemic, and we’re particularly obsessed with detailed her still-life paintings, often featuring emotive moody shadows and intriguing reflective surfaces.
‘Still life for me is a mode of storytelling, of capturing a transient moment and perspective that others may relate to,’ Leanne says. ‘The objects that we surround ourselves with contain layered histories, yet they also shape us and leave impressions on us.’
Tracey Schramm’s paintings are all about telling a ‘story’, personifying everyday objects and often mixing and matching them with other items in an elegant fashion, with contrasting colours and layered shadows.
‘I like to explore dramatic lighting in my still lifes, seeing how it can alter the way my set-ups look — a skill learnt from my other profession as a professional photographer,’ Tracey says.
Price point: From $420, framed pieces for around $900.
Melbourne-based artist and textile designer started learning oil painting from her ‘Nana’ in early 2019. Whiles she initially focused on flowers and foliage, her paintings have evolved into broader still life subjects matter, such as dreamy breakfast scenes with a view that looks like something you’d see on a European holiday, or a haul of fresh produce from visit to the Sunday markets!
‘Sometimes the paintings evolve from memories of a place or something I see, like a view through a window into a florist’s workshop,’ Amber says. Other times they’re drawn straight from her imagination and onto the canvas.
We couldn’t write this story without mentioning one of TDF’s long-time favourites, Lucy Roleff. Her richly detailed work draws inspiration from historic oil paintings, using painterly brushstrokes to create hyper-realistic and mesmerising paintings of collected objects.
Lucy says she was naturally drawn to still-life, as she enjoys the solitary and domestic elements the process. ‘Unlike portraiture or landscape work where you need to engage with another person or environment, there’s no grappling with changing weather or moods,’ Lucy says. ‘I think it’s because I like to feel a sense of control over the subject matter as well as the painting process.’
When Stacey McCall studied fine art in the ’80s, she majored in gold and silversmithing with a sub-major in painting. But 15 years ago, she went back to painting and has never looked back.
Working from her ‘very tiny studio’ at the end of her Melbourne home’s garden, she paints her domestic environment and the objects that sit quietly around her home. ‘I have raised five daughters in this house, our things are familiar, they are what I know,’ Stacey says. And she paints them well, with tenderness and affection — gorgeous!
With a background in architecture and design, Brisbane-based artist Sophie Sachs says she loves curating compositions that shape her still-life work. ‘I have always been drawn to still-life painting and have been inspired by painters like Cressida Campbell, John Honeywill and Sam Fullbrook,’ she adds.
Something as simple as an IKEA cups becomes a captivating object in her paintings, shining a spotlight on the ‘simple beauty that can be found all around’. It’s this thoughtful approach combined with light colours that imbues her work with a peaceful and still quality.
Price point: Original art ranges from $650 – $3500, while prints range from $90 – $340
Believe it or not, emerging artist Rose Goodchild’s hyper-real artworks are made up of layers upon layers of dots of her tiny paintbrush! Rose focuses on painting compositions of food and culinary settings, recreating their intricate details and textures so beautifully, they look enough to eat – and you might recognise her work from the cover of the new Tart Magazine!
‘I also have a deep appreciation for the culinary world, its sensory experiences and the personal connections I have that are associated with food and dining,’ Rose says.
Price point: Original art starts from around $800, and prints start at $90
Melbourne artist Sam Michelle started painting when she was 14. Now 40, she’s been a full-time painter for the past decade and has made a name for herself with her colourful renditions of flowers and the botanical world!
‘I am a keen gardener and find it so rewarding to source new and obscure varieties of flowers to grow and paint,’ Sam says. She finds still-life gives her ‘endless opportunities’ to capture her ever-expanding cottage garden, weaving in stories and themes from her personal life.
Margaret River-based artist Kiandra Buchanan describes her work as ‘quiet’ and ‘contemplative — and we couldn’t agree more. She has a knack for capturing the small, fleeting moments that ‘often go unnoticed’, like the way the morning light hits the washing basket or the left-out wine glasses from the night before.
‘I’m drawn to still life painting for the way you can invite pause and build a story within the scene,’ she says. ‘The way some objects hold a particular meaning for one person, and another meaning for the next, so that each viewer can read their own story within the work.’
Sydney-based artist Phoebe Stone has always drawn as a hobby, but it was only three years ago that she started creating art professionally. ‘When I started drawing again it was during the pandemic. I was home, and my home is full of cherished items I’ve collected over the years,’ Phoebe says.
Her first oil pastel drawings were really just to ‘meditate’ but after drawing her sentimental objects, the serial collector realised the emotive power of her still-life creations. ‘For me, all these drawings are a little love story to these items I collect, that tell part of my story and make up my home.’
Sydney artist Emily Heath says her still-life practice as a visual diary. Most of her paintings start with a colour that she’s drawn to, layering contrasting bold colours over pastel tones to create her memory-filled artworks that tell stories about everything from the ‘joys (and challenges) of motherhood’ to the the ‘messy spaces’ where she lives and works.
But the best part about her work is how Emily manages to turn these everyday scenes into visually pretty works that we want to hang on our walls!
If you’re into local artists, you’ll already know about Libby Haines internet-famous still life paintings, which notoriously sell out in seconds when she releases them twice a week via Instagram! There’s so much to love about her work, from her imperfect and textural paint application; the rich colours that catch your eye; and her subject matter — taking inspiration from the ‘terrible photos’ she snaps of food and her day-to-day that often spark the idea for her next painting.
‘I think the reason I love still life is that objects I see everyday and that have a certain level of mundanity to them, can become vessels for expressing more complex feelings and emotions,’ Libby notes.
Price point: Prints start at $55, original artworks from $595
Melbourne artist Brooke Holiday creates dreamy and nostalgic still-life paintings. Working from her home in Coburg, her painting practice is all about immortalising the beauty of seasonal produce, and the intimacy of memories made by sharing food around the table with the ones you love!
Each of her pieces evolves through hours of underpainting and overpainting, depicting ‘fruits, vegetables, drawn out dinners and sweet sentiments’, Brooke says. ‘Food is always infused with meaning… and these are the undercurrents that I’m interested in exploring through my work.’
Price point: commissions from $600, prints from $95
Shop Brooke’s work through her website or contact her for a commission
]]>
https://couponspreview.com/blogs/feed/5-ways-to-make-grammar-engaging-for-3rd-graders2023-06-25T03:13:50-04:002023-06-25T03:13:50-04:005 Ways to Make GRAMMAR Engaging for 3rd Gradersadmin
5 Ways to Make GRAMMAR Engaging for 3rd Graders
Here are 5 ways to make grammar for your 3rd graders engaging!
There are some common developmental traits when it comes to 8 and 9 years olds.
First, 3rd graders tend to love learning but often can tire quickly.
3rd graders are full of ideas and curious to learn, but many can’t sit still for long amounts of time.
These developmental traits can make teaching a traditional grammar lesson difficult, and we need to make sure to take their learning needs into account when brainstorming lessons!
So, how can we teach grammar to hold these 3rd graders’ attention?
I have 5 ways that will make grammar engaging, fun, and get these 3rd graders listening and wanting to learn their grammar!
Keep reading to learn about how to get your students actually enjoying learning their grammar
And don’t forget to scroll to the bottom to get your FREE reading comprehension worksheet!
#1: Keep grammar for 3rd graders short & simple
Remember – teaching grammar to 3rd graders does not need to drag on and on.
In fact… it should be the opposite!
Grammar is definitely a topic that is best learned in chunks.
Making a grammar lesson into something done every day in a small way is going to get kids more used to grammar and how it’s taught.
It’s much less overwhelming to do a littlebit of grammar each day than long chunks once a week.
How can we make teaching grammar a daily practice?
15 minutes a day.
Make it morning work.
Make it a literacy station.
Do it at the beginning of writer’s workshop or your reading block.
Find a small chunk of time during the day and make ithappen.
I have a digital Grammar for Google Classroom product that is perfect for a daily routine – assign one or two Google Slides to students a day.
Prefer paper?
I have the BEST grammar color-by-number worksheets that are amazing for dailymorning work or during a literacy station (check them out HERE!).
#2: Go digital!
Technology is a different way of learning for students that often makes it more enjoyable for students.
Technology often captures a student’s attention very quickly, which let’s be honest, is much needed when it comes to grammar.
Make the grammar learning process more dynamic for students by incorporating technology into your day!
I have a product called Grammar for Google that your students will absolutely love – it’s a bestseller for a reason.
Bye-bye, boring grammar worksheets!
It covers a total of 16 grammar topics and has over 100 activities.
It has SO MANY interactive features to it, such as drag-&-drop features as well as short answers.
Your students will actually enjoy grammar when using this product.
One teacher said “This is an amazing resource to use to review grammar skills. It’s easy to use and assign to students. An excellent way to get a quick check on how they’re progressing with these standards. ”
Teachers find that student enthusiasm and confidence grew with each new grammar skill practiced.
The interactivefeatures made grammar feel more like a game… and less like schoolwork!
Grammar hunts are super fun and can be used literally ANY time during the day.
How do they work?
Pick a part of speech. For example, nouns.
Read a passage or read-aloud, then use post-it notes to label all the nouns that students identify.
Making real-life connections is so valuable in grammar to truly understand the WHY.
Grammar isn’t just an isolated topic – we literally see and use it every single day.
Grammarhunts are fun but also powerful!
You’ll love seeing how excited that students get to find their grammar
#4: Gamify the learning process to make grammar fun for 3rd graders
Gamification is a huge educational trend right now, and it’s easy to see why teachers (and of course students!) are loving it.
Think Jeopardy-style review, quizzes, and games like BINGO!
Heck, take a quiz you already have and put people into teams and turn it into a competition!
Don’t reinvent the wheel, just take something that you already have and put a game “twist” on it.
Incorporating competition and rewards can make something not so fun become a lot more fun!
Charades is also a fun way to review grammar (for example, students have to act out a part of speech or a type of sentence! It’s super silly and funny to see what they come up with!).
#5: Bring in group activities
This age group LOVES collaboration – so bring collaboration into your grammar lessons!
3rd graders love working in groups and being social, so let them be social while learning and reviewing their grammar!
Skits work surprisingly well with grammar.
How about students are put into groups and act out grammar rules? (This one is hilarious what kids come up with).
Do a jigsaw activity where students become an “expert” on a particular grammar topic (such as assigning 1/4 of your class adjectives, 1/4 of your class nouns, 1/4 of your class verbs, and 1/4 of your class adverbs).
Then, put students into groups of 4 where each student is an “expert” on a different part of speech.
]]>
https://couponspreview.com/blogs/feed/best-bookstore-in-palm-springs-is-the-only-bookstore-but-it-tries-harder2023-06-24T15:13:51-04:002023-06-24T15:13:51-04:00Best Bookstore in Palm Springs is the only bookstore, but it tries harderadminPalm Springs has a population of well-educated residents, many with a cultural or entertainment background, and gets a huge number of visitors who are there expressly to loaf.
And yet for a decade, the city had nowhere to buy a book.
“You have tourists coming here literally to read by the pool!” Paul Carr exclaims. “It’s a rare fail of the cultural and capitalist systems at the same time. It’s madness. How do you not have a bookstore?”
Carr and wife Sarah Lacy responded last fall by opening a bookstore, the only one in Palm Springs. Its cheeky name: The Best Bookstore in Palm Springs.
“No one can argue with us,” Carr points out.
I learned about the store from reader Janet Spiegel. She wrote me after a column here about Riverside’s Cellar Door Books, which likes to tout itself as the Inland Empire’s only independent bookstore.
“Your article said there are no other independent bookstores that sell only new books in the region,” Spiegel wrote. “You missed The Best Bookstore in Palm Springs!”
To address this grievous oversight, I made a point of seeking out the shop, which is downtown at 180 E. Tahquitz Way, on my recent visit.
Coincidentally, I’d been inside the same storefront last year when it was a comics shop. One of the city’s former bookstores got its start there too. Perhaps the address is fated to sell reading matter.
The bookstore’s vibe is largely intentional: floor to ceiling bookcases on both walls, with tables and chairs in the center rather than more bookcases. The idea was that customers would mingle, overhear conversations about books and chime in.
Then there are the chatty recommendation cards, known in the trade as “talkers.” Some for shelved books are almost mini-essays, like bookseller Taylor Reddeman’s card for Joan Didion‘s novel “Play It As It Lays.”
At The Best Bookstore in Palm Springs, the “talkers,” as bookseller recommendations are known, are usually written by co-owner Sarah Lacy and are not shy about expressing enthusiasm or dishing opinions. (Photo by David Allen, Inland Valley Daily Bulletin/SCNG)
By contrast, the talkers on the entry table display, most of them written by Lacy, are filled with exclamation marks and all-caps.
On Katrine Engberg’s “The Tenant”: “Start the next HOTTEST Scandinavian crime series NOW!”
On Jesse Sutanto’s “Four Aunties and a Wedding”: “NOT QUITE as good as Miller or Barker but BRILLIANT as a story of women paying the price for what MEN do (with some hope at the end!)”
On Audrey Niffenegger’s “The Time Traveler’s Wife”: “Wish I could go back in time (HAR!) and read it for the first time.”
“We write them like a friend grabbing your arm,” Carr says. “The same tone you find online, the enthusiasm.”
The store came about to fill a need, for the community and for themselves.
Carr and Lacy were tech journalists in San Francisco who relocated to Palm Springs shortly before the pandemic.
Both are big readers. Lacy has a degree in English literature and writes business books. Carr was involved in writing, editing and publishing in his native London. They’d just left San Francisco’s Mission District, where four bookstores were within walking distance.
“We could not believe there was not a bookstore in Palm Springs,” Carr says.
After two years of “grousing about the lack of bookstores,” as Carr put it, and saying in social situations that “someone should really open a bookstore,” the couple pivoted to thinking that they should be the ones to do it.
They remortgaged their home and got backing from friends, as well as advice from Elizabeth and Otis Chandler, the founder of Goodreads.
Best Bookstore opened the day before Thanksgiving 2022.
Carr had calculated the minimum take they needed each day to survive. “The first day we did 12 times what we would have to do,” he says, and not a day has gone by when the shop hasn’t exceeded that minimum.
Running a bookstore is both harder work and more fun than Carr envisioned. One benefit is the clientele: “If you open a bookstore,” he reasons, “eventually every interesting person in Palm Springs will enter.”
The Best Bookstore in Palm Springs occupies a storefront downtown and opened in November 2022. (Photo by David Allen, Inland Valley Daily Bulletin/SCNG)
“When I saw a bookstore was opening here,” bookseller Dillon Bloodworth confides of Best Bookstore, “I said ‘yes’” — he pumps his fist — “and then I ended up working here.”
The 1,000-square-foot shop has nearly 20,000 titles, either on display or in storage, double the number at opening. It offers free shipping anywhere in the U.S. and same-day delivery locally to residents or visitors.
Shopping at an independent bookstore instead of a chain or on Amazon shouldn’t be “about guilting people,” Carr insists. “We’re not a charity. We should be better.”
All the store sells is books, plus a few magazines and jigsaw puzzles.
“There’s about 10,000 places in Palm Springs where you can buy a journal,” Carr observes. “No, this is a bookshop. People want to buy books.”
The No. 1 seller: “The Guncle,” about a man who unexpectedly finds himself the primary guardian for his niece and nephew after a family tragedy. He is their gay uncle, or guncle. It’s set in Palm Springs, home of author Steven Rowley.
While many bookstores and libraries are under pressure from touchy people, the desert has fewer snowflakes, in both senses of the term.
“We have lovely customers,” Carr says. “This is Palm Springs. If you’ve made it this far, books probably aren’t going to bother you.”
As we speak, a regular walks in: Grace Garner, the mayor.
Palm Springs Mayor Grace Garner, a regular customer, buys a book from Taylor Reddeman at The Best Bookstore in Palm Springs. “People read a lot here,” Garner says of her city. (Photo by David Allen, Inland Valley Daily Bulletin/SCNG)
She picks up “Braver Than You Think” by Maggie Downs, which she likes to give as a gift.
“I tell people all the time now, ‘This is the place to come to buy a book,’” Garner says. “People read a lot here. The Crown Books closed right after I graduated high school, and that was 20 years ago.”
If a second bookstore ever opens in town, Carr jokes that he and Lacy might have to soften their store’s name to The Better Bookstore in Palm Springs. But he’d rather the store stayed worthy of its boast.
“That’s my dream,” Carr admits, “that even if there were more bookstores in Palm Springs, we would still be the best.”
David Allen, one of the Inland Empire’s better newspaper columnists, writes Sunday, Wednesday and Friday. Email dallen@scng.com, phone 909-483-9339, like davidallencolumnist on Facebook and follow @davidallen909 on Twitter.
]]>
https://couponspreview.com/blogs/feed/ravensburger-disney-mickey-mouse-mosaic-mickey-1000-piece-jigsaw-puzzle-for-adults-every-piece-is-unique-softclick-technology-means-pieces-fit-together-perfectly-19-802023-06-23T09:13:52-04:002023-06-23T09:13:52-04:00Ravensburger Disney Mickey Mouse: Mosaic Mickey 1000 Piece Jigsaw Puzzle for Adults – Every Piece is Unique, Softclick Technology Means Pieces Fit Together Perfectly $19.80admin
Ravensburger has been making toys for the hand, head, and heart for over 130 years. Our 1000 piece jigsaw puzzles for adults will bowl you over with premium quality, in terms of both content and material. Ravensburger’s puzzles are made to fit precisely – no matter how large or small the puzzle, each is precision made so that every piece fits perfectly, without frustration. Best of all, every single piece in this puzzle is unique, no duplicates and no frustration. Jigsaw puzzles help support a child’s development as they play, building skills such as concentration and creativity, and are great fun for adults, providing a great experience whether you’re puzzling by yourself or with a group. Get this Ravensburger Disney Mickey Mouse: Mosaic Mickey 1000 Piece Jigsaw Puzzle for Adults – Every Piece is Unique, Softclick Technology Means Pieces Fit Together Perfectly for only $19.80!
Bestselling puzzle brand worldwide – With over 1 billion puzzles sold, Ravensburger is the bestselling puzzle brand worldwide
What you get – 1000 piece Ravensburger jigsaw puzzles for adults are crafted with premium quality, in terms of both content and material, and have a completed size of 27″ x 20″
Every piece is unique – None of the frustrations you find with other puzzle brands With Ravensburger, every individual piece has a completely unique shape
Perfect for your child – Puzzles for toddlers and kids of every age help support a child’s development as they play, building skills such as concentration and creativity.
Makes a great gift – Puzzles are a fun activity to do alone or in a group, and make a great gift for all ages at birthdays and holidays.
Remember, Amazon prices can change at any time.
This post contains affiliate links.
]]>
https://couponspreview.com/blogs/feed/rebuilding-lives-after-medical-negligence-in-indiana2023-06-22T03:13:50-04:002023-06-22T03:13:50-04:00Rebuilding Lives After Medical Negligence in Indianaadmin
—
No one goes to a doctor or a hospital expecting to come out worse than when they went in. Unfortunately, sometimes that is precisely what happens. When it does, it’s not just a health setback—it’s a matter of medical negligence. One of the states where this issue is quite prevalent is Indiana. In this comprehensive guide, we’ll discuss how victims of medical malpractice in Indiana can rebuild their lives after such traumatic incidents.
Rebuilding your life after medical negligence can feel like trying to piece together a jigsaw puzzle with missing pieces. How do you move on from such a catastrophic event? How do you regain your lost health, emotional stability, and financial balance? In Indiana, there are paths forward, and it all starts with understanding what medical negligence entails.
Understanding Medical Negligence
Medical negligence, also known as medical malpractice, occurs when a healthcare provider fails to follow established professional standards, resulting in patient harm. It could involve anything from a surgical error to a misdiagnosis.
The Impact of Medical Negligence
The effects of medical negligence extend far beyond physical harm. It can lead to emotional trauma, financial hardship, loss of trust, and prolonged suffering.
Navigating the Legal Landscape
To rebuild your life after medical negligence, it’s crucial to understand your legal rights and how to fight for them. To do so, you can get help from a medical malpractice attorney who understands Indiana’s legal landscape.
Mental Health and Recovery
Facing medical negligence is a traumatizing experience that can lead to mental health challenges. It’s crucial to acknowledge these difficulties and seek professional help to recover.
Recognizing the Emotional Impact
Depression, anxiety, and post-traumatic stress disorder (PTSD) – are some of the mental health conditions that medical negligence victims might face.
Seeking Professional Help
Psychologists, therapists, and support groups play an instrumental role in helping victims cope with the emotional trauma following medical negligence.
Incorporating Mindfulness and Self-Care
Practicing mindfulness, pursuing hobbies, and prioritizing self-care can aid the healing process and provide a sense of control amidst the chaos.
Financial Rehabilitation After Medical Negligence
Medical negligence often results in a financial crisis due to mounting medical bills and potential loss of income. It’s crucial to strategize for financial recovery.
Understanding Your Insurance Coverage
Knowing the extent of your health insurance coverage is critical in managing medical costs. You should also explore disability benefits if you’re unable to work.
Seeking Compensation through Legal Channels
Filing a medical malpractice lawsuit with the help of a skilled attorney can provide financial compensation for damages and losses.
Managing Your Finances
Financial planning and budgeting can help stabilize your financial situation during this challenging time. Consider seeking advice from a financial advisor.
Physical Rehabilitation and Healthcare
Physical recovery is a fundamental part of rebuilding your life after medical negligence. It’s essential to find trusted healthcare providers and establish a comprehensive recovery plan.
Finding Trusted Healthcare Providers
Having a reliable healthcare team is critical in the recovery process. Do your due diligence to find competent professionals with positive track records.
Establishing a Recovery Plan
A personalized, comprehensive recovery plan can guide your healing process. Include physical therapy, follow-up appointments, and wellness check-ups.
Embracing a Healthy Lifestyle
Eating nutritious food, maintaining a regular sleep schedule, and staying active can significantly aid your physical recovery.
Community Support and Resources
Victims of medical negligence are not alone. Various community resources and support networks can provide much-needed assistance during these challenging times.
Connecting with individuals who have been through similar experiences can provide comfort, advice, and a sense of belonging.
Local organizations in Indiana often offer counseling, financial aid, and other forms of support to medical negligence victims.
Participating in awareness campaigns can provide a sense of purpose, helping you transform your traumatic experience into a force for change.
In Conclusion, rebuilding lives after medical negligence in Indiana is a multi-faceted process involving mental recovery, financial rehabilitation, physical healthcare, and community support. With the right resources, professional guidance, and a resilient spirit, victims can restore their lives and even find a newfound sense of purpose.
FAQs
Q1: What constitutes medical negligence?
A1: Medical negligence occurs when a healthcare provider deviates from established professional standards, causing harm to a patient.
Q2: How can I rebuild my life after medical negligence in Indiana?
A2: Rebuilding your life after medical negligence involves mental recovery, financial rehabilitation, physical healthcare, and community support.
Q3: Can I seek compensation for medical negligence?
A3: Yes, victims of medical negligence can file a lawsuit to seek compensation for their damages and losses.
Q4: How can a medical malpractice attorney help me?
A4: A medical malpractice attorney can guide you through the complex legal process, helping you fight for your rights and secure the compensation you deserve.
Q5: What resources are available to help victims of medical negligence?
A5: Support groups, professional mental health services, financial planning services, and local organizations are among the resources available to victims.
Q6: Can medical negligence lead to mental health issues?
A6: Yes, the traumatic experience of medical negligence can lead to various mental health conditions, including depression, anxiety, and PTSD.
]]>
https://couponspreview.com/blogs/feed/a-diy-hanging-daybed-plan-for-outdoors2023-06-21T21:13:52-04:002023-06-21T21:13:52-04:00A DIY Hanging Daybed Plan For Outdoorsadmin
Spend spring time (or anytime) with an outdoor hanging daybed. Today's DIY teaches you to build your dream daybed for a relaxing siesta, and have it in style.
A DIY Hanging Daybed | Turning A Dream Into A Reality
This DIY hanging daybed is only a fraction of what it would normally cost if bought at retail. If you’re looking to save some dollars and get crafty with your backyard or front yard, then try this DIY!
Here’s what you’ll need to make the hanging daybed:
Sketch out your preferred design on a board and cut the template out using a saw. To make it easier, you can choose to sketch only half of the design.
Step 2: Trace Template On The Boards
Once you’ve got a template, trace over it with a pencil on your board. If you’ve only sketched and cut out half of your template design, simply flip it over to the other side when marking for the other half.
Step 3: Cut Bottom Supports To Size
You’ll need a total of 5 bottom supports for the hanging daybed. Cut them to length using a miter saw.
Step 4: Drill In Pocket Holes
Once you have the bottom supports cut to your preferred length, drill 2 pocket holes on 1 end of each board. Aside from this, you’d also want to drill 5 pocket holes on 1 side.
Step 5: Attach Supports To The Footer
Place 2 of the supports on either end of the footer and screw these in place. Before you place the remaining 3 supports, clamp a board in place for an easier mount and attachment.
Step 6: Prep Deck Pieces
Cut 5 deck pieces to your desired length and drill in 3 pocket holes in each end. This tutorial used a length of 1”x6” for the deck pieces.
Step 7: Attach Deck Pieces
Take your deck pieces and attach them to the daybed’s frame. Start by drilling screws on one side. Then, drill into the center supports. Finally, drill the screws on the opposite side. Repeat this until all 5 deck pieces are attached to the frame.
Step 8: Cut The Side Supports
Cut out your side supports from the 1×4 board using a miter saw. You’ll want 7 pieces measuring 21” each. Then cut them down to about 1 1/2” with a table saw.
Step 9: Strengthen Side Supports
Take your 7 side supports and group them into 2 — one with 4 pieces and another with 3 pieces. Of the group with 4 pieces, take 2 side supports and apply wood glue on one side. Then, place them on top of the remaining 2 side supports without glue. Clamp down on these pieces to help them stick together as they fully dry.
Step 10: Cut Out Rails And Stiles
While waiting for the strengthened side supports, you can proceed with cutting out the rails and stiles. Cut out 2 rails for the top and bottom of the daybed. Once you’re done, cut the stiles or vertical slats. You’ll need about 15 pieces of stiles.
Step 11: Round Out The Edges
Round out the edges of your stiles using a router with a round over bit. You can do the same to the front of the footer as well.
Step 12: Sketch Out The Side
Similar to steps 1 and 2, sketch out a template design for the side, and cut it out. Trace it over a board, then, flip it over for a symmetrical piece.
Step 13: Cut And Attach The Side To The Frame
Cut the sketch made in step 12 and attach it to the side of the frame with the help of pocket holes. If you’d like, you can also grab a jigsaw, and cut out a few edges of the footer to reduce the sharpness of some lines.
Step 14: Paint Wooden Pieces
Before you resume assembling the daybed, layer on a few coats of paint. Remember to paint the entire frame, the back supports, as well as the rails and stiles.
Step 15: Check The Angle
Using an angle finder, grab one of the arms you’ve cut earlier and look for a preferred angle on which to set the arm with. The angle finder will help you match this angle to the other pieces.
Step 16: Attach Back Supports
Use a drill press to make a 1/4” hole. Then, clamp the back support in place and drill screws onto the bottom support. Finish off by attaching a carriage bolt, flat washer, and a nylon net. Repeat the step on the other side.
Step 17: Prep Stiles For Rails
Start by drilling pocket holes on each side of the stiles. Once you’re done, attach the stiles on the rails.
Step 18: Attach Back Support To Stiles
Place 3 pocket holes on the back supports to help drill the screws in place. Don’t forget to space out the back support in such a way that they won’t be seen from the front of the daybed.
Step 19: Cut Out Armrest
Sketch out how you’d want your armrest to look like and cut this out using a jigsaw. If you’d like, you can also cut out a hole on the armrest to make for a nifty cup holder.
Step 20: Assemble Arms
Cut out more slats to place under the armrest you’ve just made. Use a pocket hole to attach the armrest to the back and then keep everything in place by drilling pocket holes on both ends of the slats.
Step 21: Add More Support To The Arms
Add extra support to the arms by attaching a front piece. To do this, start by sketching out the front piece on a board, then cut it out with a jigsaw. Round off the edges, apply a coat of paint, and attach the piece in place using pocket holes.
Step 22: Attach The Front Eyebolts
Drill a hole in the front of the swing. Then, insert a nylon nut, followed by a fender washer. Once both are in place, insert the eyebolt. Don’t forget to place a fender washer and a nylon nut on the backside as well. Tighten to secure and ensure the eyebolt is vertical.
Step 23: Attach Carriage Bolt And Add Chain
Attach a carriage bolt in the back part of the daybed. Add in the chain once you’re done.
Step 24: Drill Holes For Chains
Drill two holes on either side of the arms and insert the chains through. Finish off by using S hooks to help link the chains together.
Step 25: Add Cushions
Make the hanging daybed more lounge-worthy by placing a few cushions on the bottom and along the sides. It’ll make a huge difference in terms of comfort.
And there you have it!
Now you have your very own hanging daybed to display and use in your backyard.
Press play below for the full video tutorial of the hanging daybed:
I hope this hanging daybed gives you more reasons to spend extra time out on the patio, especially during this Spring season. After all, it’d be a waste not to soak up some sun and bask in the beautiful weather this Spring!
Did you like this hanging daybed DIY? Let us know in the comments below!
]]>
https://couponspreview.com/blogs/feed/30-candid-pictures-i-captured-in-the-streets-of-various-cities2023-06-20T15:13:51-04:002023-06-20T15:13:51-04:0030 Candid Pictures I Captured In The Streets Of Various Citiesadmin
My name is Polly Rusyn and I’m a full-time photographer and I run street photography workshops in awesome European cities.
I like to think of street photography as capturing a moment from the accidental theatre that is unfolding in front of me made up of strangers going about their daily life. The star of the show could be a quirky character or it could simply be some interesting light, dark shadows, geometric shapes, or bold colors.
I believe that street photos are hanging out in the street just waiting to be seen, and it’s my job as a street photographer to find them, and then be quick enough to capture them, creative enough to compose them, and stealthy enough not to get “caught in the act” by the people I’m photographing, so that no one gets disturbed by being part of the puzzle I’m solving.
Let me know which photos you like the most in the comments!
When something catches my eye, my brain starts processing, guessing, and imagining what kind of a picture I could create out of all the elements converging serendipitously around me. Sometimes I can see one, sometimes I can’t. For me, the process of “making” a candid street photo is like building a jigsaw out of different pieces of bright sunlight, inky shadows, curious forms, bold color, quirky characters or interesting happenings to which I’m being drawn. I love not knowing what the final picture will be, and that’s part of the fun in creating unstaged compositions of everyday goings-on out in the world.
#2
#3
#4
#5
#6
#7
#8
#9
#10
#11
#12
#13
#14
#15
#16
#17
#18
#19
#20
#21
#22
#23
#24
#25
#26
#27
#28
#29
#30
]]>
https://couponspreview.com/blogs/feed/how-to-celebrate-father-s-day-in-a-large-family-opinion2023-06-18T03:13:50-04:002023-06-18T03:13:50-04:00How to celebrate Father’s Day in a large family | Opinionadmin
Greg Richardson poses with 15 of his children, their spouses and grandchildren at his daughter’s wedding in October 2021. Four of Greg’s children and two of his grandchildren are not in the photo.
Meredith Roberts
“There was an overwhelming sense that I just wanted to do something to help. ... When you see something like that, cages on walls and firehoses for ‘bathing,’ I knew we just couldn’t turn away ... we couldn’t ignore it. We needed to do something to help.”
When I asked my husband, Greg, about his experience with our first adoption, and the impetus behind me getting on a plane and heading to Romania, this is what he told me. He remembered things that I did not. When he mentioned cages, I remembered that I had actually seen one, in one of the Romanian orphanages I was in. It was horrible.
I wrote about my family on Mother’s Day, our unique family of 25 children from eight different countries, of different races, ethnicities and abilities. When I thought about writing a piece for Father’s Day, I was asked if I knew what my husband thought about being the dad of such a large and uncommon family, or if I only thought I knew. Turns out, it was some of both. It was an interesting and quite emotional experience to interview someone I’ve been married to for more than 37 years. I highly recommend it.
I asked Greg about the questions he gets asked most often, and they are different than the ones I most commonly get asked. The one he gets asked the very most is “How many?!” (25. The answer is 25.) He is also often asked, “How did you afford it?”
The answer, he says, is that the money was always there when we needed it. Often, we would get right up to the financial edge, and then money would come. We also need to note that many of our adoptions were less expensive than the average adoption today.
The two questions I get asked most often are first, “How do you cook for that many?!” and second, “How did you convince your husband to ‘let’ you adopt that many kids?”
First, with 20 children in our home at our peak, the answer was we cooked from scratch, we rarely ate out, we octupled recipes, and we used big pans.
The answer to the second question, though is that you don’t accidentally adopt. There is way too much paperwork. Greg answered this question for me as well. He told me that while I was almost always the first one to recognize that kids were missing from our family, he also got his own assurances. He had dreams, for example, of a massive tsunami headed our way, and he was unable to find all of our kids to get them to safety. When he shared those dreams with me at the time, I told him basically, “I know — they’re missing from our family, and we need to go get them.”
Differences
It might be obvious, but we have different ways of parenting. Greg told me that he watched love pour out of me in a way that was not only visceral but almost visible. For him, with a full-time job away from home, he had different ways of interacting with the kids: wrestling around, working on jigsaw puzzles together, home improvement, home repair and car repair projects.
We powered through the sheer logistics of it all — feeding, clothing, getting kids to school on time, helping with homework, going to kids’ events. It was a lot.
“Looking back, I don’t know how we did it,” he said, but we did. Ralph Waldo Emerson said, “That which we persist in doing becomes easier to do, not that the nature of the thing has changed but that our power to do has increased.” That and a whole lot of prayer.
We are also different in how we grieve, whether that’s an unexpected diagnosis, more significant challenges or the grief of burying our daughters. We have lost six. Greg says the grief of dealing with the death of our daughters hit him like a tidal wave.
“I can’t put it in a box. It’s too big.” Then he was out the other side.
For me, going straight into that overwhelming amount of grief would have killed me. Rather than diving into a metaphorical tidal wave, I grieve more slowly, in small bits that I can handle. When our daughter Angelia died, I cried every day for two years. One thing we both have in common, though, is that we have been deliberate in supporting each other in our different ways of grieving.
Advice
“Parenting is like the ‘Forrest Gump’ quote: ‘Life is like a box of chocolates, you never know what you’re going to get.’” Greg’s advice to other fathers is to know going in that every child is different. There is no manual, and if there were, it would change with the next child. There will be many opportunities for you, as a parent, to learn and to grow — and parenting lasts forever, even when your own children have children. He believes that our role as parents is to love our children, even when they make choices we might not have made, and that we are always works in progress.
Finally, I asked him if he would do it all again.
“Absolutely,” he said. “Even with all the challenges we’ve faced, I would absolutely choose each child again.”
]]>
https://couponspreview.com/blogs/feed/what-s-new-to-streaming-and-theaters-this-week-the-flash-to-black-mirror2023-06-16T21:13:52-04:002023-06-16T21:13:52-04:00What’s new to streaming and theaters this week: 'The Flash’ to 'Black Mirror’admin
Looking to fill the Succession-shaped hole in your life? Maybe you're hungry for some big-screen horror or a multiverse of action heroes! Whatever your vibe, there's surely something to watch this weekend.
From a brand-new season of Black Mirror, with arguably some of the darkest moments of the show so far, to the comic book stylings of The Flash,a lot of great (and not-so great) stuff has been released this week. So whether you're in the mood to order in and veg out with a new show or you're headed to the theater for a night out, here are the highlights of this week's streaming and theatrical releases.
Asteroid City
Credit: Focus Features
Screw the Wes Anderson-inspired TikToks — go watch the real deal for yourself! Anderson's latest feature film, Asteroid City, is set in 1955 at a Junior Stargazer/Space Cadet convention where a lovable group of oddballs get together for some wholesome educational fun. Along with Anderson's typically twisty plots and a steadfast love for the color orange, Asteroid City also features an all-star cast including (but not limited to) Tom Hanks, Tilda Swinton, Bryan Cranston, Margot Robbie, Scarlett Johansson, Jeffrey Wright, and many more.
What we thought: "There's plenty that's familiar to Anderson's aesthetic in Asteroid City, from its crisp framing, traveling panning shots, quirky characters with muted delivery, familiar faces, and a sense of humor that is silly while sophisticated. Yet, there are thrilling explorations here too… All of these elements bend and fold, hooking around one another to create a work of art that is lovely to look at, and all the more wondrous the closer you consider its construction." — Kristy Puchko, Film Editor
A Juneteenth weekend getaway goes horribly awry in The Blackening when a group of friends in an isolated cabin find themselves forced to play a twisted game — but that's not all. The film is also hellbent on making fun of every horror cliché out there, from Jigsaw in Saw to how the one Black character in every horror film always dies first. With a hilarious cast that includes Grace Byers, Jermaine Fowler, Jay Pharoah, and co-writer Dewayne Perkins, The Blackening is a horror comedy brimming with as much fun as it is frights. Keep your eyes peeled for killing jokes, and well, actual killers.
What we thought: "As a feature film, The Blackening augments the spry, funny conceit, makes sharp references to other Black movies, and offers a hilarious and touching horror comedy that redresses cultural stereotypes." — Robert Daniels, Freelance Contributor
Has Pixar finally done an actual rom-com? Kinda! Elemental, the latest visually stunning work by the prolific studio, is set in Element City — a place where fire-people, earth-people, wind-people, and water-people live together in questionable harmony. When trouble starts brewing in Element City, Ember (voiced by Leah Lewis) and Wade (voiced by Mamoudou Athie), form a spark (literally) and start falling in love despite coming from polar opposite worlds. Plus, there's a new Pixar short airing before Elemental that you don't want to miss — and yes, it includes Carl from Up.
What we thought: "Lewis and Athie bring Ember and Wade's initially clashing personalities to life with striking vocal chemistry, to the point that I was basically kicking my feet and giggling during their every scene together." — Belen Edwards, Entertainment Reporter
The speedy superhero is back, and this time he's up against...himself? The Flash follows Barry Allen (Ezra Miller) as he travels back in time and finds himself in a multiverse mess. With some familiar friends along the way — Michael Keaton's Batman is back, folks! — it's up to the Flash to save the day. (The Flash is under an extra layer scrutiny due to the allegations against its lead, as well as recent studio shake-ups.)
What we thought: "The Flash strives to appease apparent studio demands, the fickle love of fans, the gnawing yearning for nostalgia, and the increasingly impossible task of finding something new to say while repeating the same stories, and succeeds at none of it. Or maybe it's just not my speed." — K.P.
A new season of Black Mirror is finally upon us! From a sexy '70s demon and creepy true crime to sinister space adventures, this season of Black Mirror is dishing out all the existential dread and notorious nihilism that we all love, and for some reason, enjoy watching. The sixth season has five new, wildly entertaining episodes, as well as a star-studded cast that includes Salma Hayek Pinault, Aaron Paul, Annie Murphy, and Michael Cera. And there may or may not be some explosive poop as well.
What we thought: "Season 6 delivers an outrageous comedy with 'Joan Is Awful,' a true crime-inspired thriller with 'Loch Henry,' a domestic drama with 'Beyond the Sea,' a Hollywood horror story with 'Mazey Day,' and a cheeky horror comedy with 'Demon 79.' Each is a battle for the future of this series, and maybe even the future of streaming." — K.P.
Sure, Tyler Rake (Chris Hemsworth) may have been shot in the neck at the end of Extraction, but he's alive, well, and ready for some action in this sequel. Rake's new high-thrills quest sees him trying to save a gangster's imprisoned family by any means necessary. Some people bail themselves out of jail, others get into painfully long fight sequences instead — both are pretty efficient in their own ways, I'd say.
What we thought: "With its bigger, broader swath of carnage, Extraction 2 improves upon the original and isn't unpleasant (you know, unless you're bothered by watching hundreds of deaths on screen). There's value in the fun of big, dumb action movies, but this one's worst fault is its clumsy stab at being something more." — Kimber Myers, Freelance Contributor
Based on Michael Ausiello's memoir about the death of his husband, Kit, from cancer,this tearjerker stars Jim Parsons and Ben Aldridge as life partners on a tragically truncated journey together. The movie begins with Kit's death, which is just one of the unique flourishes at work in this rom-dramedy from The Big Sick director Michael Showalter.
What we thought: "Spoiler Alert might tell us its ending up front, but it does so in the same way a magician uses a waving hand, directing our attention one way so it can sneak into our hearts around the back side." — Jason Adams, Freelance Entertainment Writer
]]>
https://couponspreview.com/blogs/feed/the-blackening-review-tim-story-s-black-horror-comedy-takes-a-slash-out-of-the-genre2023-06-16T09:13:53-04:002023-06-16T09:13:53-04:00'The Blackening’ review: Tim Story’s Black horror comedy takes a slash out of the genreadmin
Before Black horror gained a mainstream foothold with the release of Jordan Peele's Get Out— though you can be sure Black horror existed before his film — the Black people who did populate genre films shared a defining characteristic: They were always the first to die.
Omar Epps and Jada Pinkett perish in Scream 2; Scatman Crothers is snuffed out in The Shining; Samuel L. Jackson is eaten by a shark in Deep Blue Sea (LL Cool J, however, does survive). Black spoofs like the Scary Movie franchise and A Haunted House both lampooned the image of Black folks in horror movies. But even those films are more in conversation with the genre's tropes than as standalone visions of Black life.
The Blackening doesn't merely lampoon. It exists in a singular milieu. The Tim Story-directed comedy, slyly smart and wildly subversive, is a return to form for the director following two underwhelming offerings in Shaft and Tom & Jerry. It finds inspiration in a sketch written by comedian Dewayne Perkins — who also stars in this film — for Comedy Central. The sketch was simple: A group of Black people trying to evade a slasher take refuge in a home where their sole hope of survival stems from them needing to choose who is the Blackest among them. That person will be sacrificed to the white murderer lurking outside.
As a feature film, The Blackening augments the spry, funny conceit, makes sharp references to other Black movies, and offers a hilarious and touching horror comedy that redresses cultural stereotypes.
With friends like this, who needs enemies?
Credit: Glen Wilson
From the jump, Tracy Oliver and Perkins' witty screenplay is a riot: It begins with Morgan (Yvonne Orji) and Shawn (Jay Pharoah) in a cabin in the woods. Before the couple makes light romance, they discover a door at the end of the hallway labeled "game room." Inside the space they find plenty of board games, but there's one, located at the center of the room, that really catches their eye. It's called The Blackening.
The rules of the game are a combination of Monopoly, Trivial Pursuit, and Risk, replete with tokens and trivia questions. At the center of the board is a "Sambo" figure who tells Morgan and Shawn, with the glee of Jigsaw, that they must answer a question correctly — to name one Black character who survived a horror movie — if they want to leave the room alive. They fail. Blood spatters, screams echo, the screen goes black. The opening is a clear metaphor for how this film is literally trying to rewrite the rules of the game: The film will be about the Black people who do survive.
You would think, nevertheless, that the first few minutes would only provide a cold start, and we'd soon be introduced to a set of individuals disconnected from Morgan and Shawn. But the script doesn't take the easy way out. See, Morgan and Shawn were alone at the cabin priming the place for a 10-year reunion with their friends.
Taking place on Juneteenth, the cadre of companions are a bundle of buried feuds and lost heartaches: The forward Dewayne (Perkins), for instance, has never forgiven the dapper Nnamdi (Sinqua Walls) for breaking the heart of Lisa (Antoinette Robertson). Only their mutual friend Allison (Grace Byers) knows Lisa and Nnamdi are back together, leaving Dewayne in the dark. Meanwhile the zen King (Melvin Gregg) and boisterous Shanika (X Mayo) trade barbs as the comic relief of the group. It's only the nerdy, nasal-voiced Clifton (Jermaine Fowler) who seems out of place, especially when the group decides to play spades — a game that'll pay dividends later as a villain origin story.
In The Blackening, spades is the Most Dangerous Game.
Credit: Glen Wilson
Rather than providing an undemanding series of jokes spoofing horror films, The Blackening instead operates as an interpersonal comedy: Nnamdi, for instance, ribs King for not only being a reformed gangster, but being married to a white woman. Dewayne, meanwhile, throws barbs at Nnamdi for his philandering past. At other points there are jokes connected to Set It Off and, of course, Get Out. The Blackening, in that regard, isn't so much a response to the lack of Black people in white genre movies as it is a reflection of the richness of Black cinema itself.
Before long the friends do discover the game room, whereby they are locked in. They will be released if they answer 10 straight questions correctly, regarding Black pop culture. But, thoughtfully, they must also answer queries that test the stereotypes of Blackness. At one point they're asked how many Black people appeared on the television series Friends. Each claims they never watched that white show. And yet, they're all able to at least provide one name, proving that they did watch Friends.
The film further needles the perception of monolithic Blackness when the game asks them to sacrifice the person they believe is the Blackest. Each person provides a reason for why they don't fit the bill: Dewayne offers up that he's queer; Lisa says she's biracial; King even uses his white wife as an excuse. These are all actual slings thrown against African Americans, sometimes by one another, to make a singular vision of Blackness that doesn't exist. Story's film entertainingly dissuades such preconceptions while providing memorable laughs in the process.
The Blackening is an act of bold defiance.
Credit: Glen Wilson
That doesn't mean The Blackening doesn't provide frights, however. A white slasher bedecked in a Sambo mask appears with a crossbow to hunt his prey. Consequently, the entire back half of the film becomes an extended freakout; the crew dodges arrows as they attempt to find a way to escape. While editing doesn't carry the kind of crispness you'd want in generating scare, in this span, several members of this deep ensemble have standout moments: Perkins as the rare queer character in a Black horror film is an unbridled stack of kinetic energy; X Mayo delivers a piercing stream of one-liners with aplomb; Fowler relishes his time as the nerdy outcast.
For the most part, this group doesn't see themselves as a set of individuals, like most white people in horror films. When it's time to split up, this band of friends can't even utter the words for fear of vomiting. They realize their best chance at survival arises from their togetherness, their intimacy, and their shared history. Though the ending is pretty easy to see coming, the obviousness doesn't subtract from the delirious enjoyment the film offers. The final shot isn't one of breathless endurance, it's one of unfettered defiance. As such, Story's The Blackening is a subtle, thought-provoking, yet endlessly rapturous take on the horror genre sure to invite more spins on its unique vision.
]]>
https://couponspreview.com/blogs/feed/malls-becoming-homes-jigsaw-puzzle-of-moving-parts-california-developer-says2023-06-15T15:13:51-04:002023-06-15T15:13:51-04:00Malls becoming homes? ‘Jigsaw puzzle of moving parts,’ California developer saysadminShopoff Realty Investments bought 26 acres at Westminster Mall and and has submitted plans to the city for 1,065 rental units and 102 ownership townhomes. The plan also includes roughly 10% affordable units. (Rendering courtesy of AO)
One suggested salve for California’s housing affordability ailments is turning dead or dying retail space into new residences.
Bill Shopoff knows a few things about such projects. His company Shopoff Realty Investments controls four California retail properties that could one day be new housing.
The veteran real estate developer has learned it’s not easy to create financially viable housing from underperforming stores. It’s no simple task satisfying stakeholders that include home seekers, government, merchants, investors, bankers, and the property’s neighbors.
“We find these sites, then it’s just a kind of a jigsaw puzzle of moving parts,” he says.
Shopoff and partners are working on retooling four shopping sites…
Westminster Mall: Bought 26 acres including anchor store sites with plans for 1,065 rentals, 102 for-sale townhomes, a 175-room hotel and new retail space.
Fullerton: Acquired an ailing 14-acre neighborhood shopping center in 2021 with hopes of creating new housing and shopping.
Pleasanton: Bought 8.4 acres at the Stoneridge Mall, comprising the former Nordstrom store and its parking lot. Shopoff is in the early planning process.
Santa Barbara: Acquired a three-story, 175,000-square-foot former Nordstrom property downtown with mixed-use possibilities.
Shopoff shared his thoughts about what makes a location a potential fit for a retail-to-residential transformation. The interview has been edited for length and clarity …
Q. What’s the secret sauce?
A. Can I build a house, apartment, hotel, or whatever that is going to pencil to some reasonable land value? Is it going to be worth more money than what I paid for it?
I could put X number of homes on it. Can I pay this much for the land and still make a reasonable profit when I sell it to a homebuilder?
Q. What about the city itself?
A. Is there governmental or local support for the project? Not that we have to have everybody in love with the project, but we don’t want to go where nobody loves the project. The state’s given us some legal tools so that the city doesn’t have to love the project. If it falls under the affordability criteria, cities may be essentially bound to do that project whether they want to or not.
Q. Can retail to residential make housing more affordable?
A. We’re focused on the mixed-income community where I’m creating 10% or 20% affordable residences. More housing like this will be part of the solution to affordability. But these communities alone are not going to solve the problem. It’s going to take more capital and more commitment from society. I don’t know that we have the resolve yet.
Q. How do you get these projects to pencil?
A. We have to fashion a win for all parties. It’s making us rethink things. We don’t have graders on site. We’re not building anything today but we’re kind of feeling like this is the perfect time to get some projects approved. Be ready to build in ’24 and ’25. That’s our plan.
Q. Is there a significant supply of such sites?
A. We are over-retailed in California. The challenge is finding that center where you can make a transaction on. It’s hard. You know, we bought the deal in Fullerton two years ago. I thought by now we’d be done.
Q. Is this good for merchants? Some people fear the loss of shopping options.
A. I call it retail therapy. I sincerely believe if we took out 20% of the poorly performing centers – and let’s say they’re running 60 or 70% occupancy – those tenants could go to the other 80% and fill those centers.
The mall owner would be happier. The consumer is happier because they got better stores. And the business owner is happier because he or she is in a more vibrant place.
At Westminster, new retail would be a fraction of what’s there today. But we think that new retail will be healthy and desirable.
It’s not going to make a lot of money building 25,000 square feet of retail. That’s not a needle mover. We hope that because we did that, the home builders will be more interested or the apartment residents will pay slightly more. That’s the value proposition.
Q. What attracted you to Westminster?
A. You had a pretty failed business enterprise – the mall – and the city realized they had to retool it. It had to become something else. It had reached a tipping point where there’s no real incentive for owners to put any more capital into the building, parking lots, etc.
Q. And Fullerton?
A. It used to have a CVS, but the drugstore has been dark for a long time. It used to have a grocery, but that become a spa. The businesses were failing. When we bought it, only a fraction of the tenants were paying rent – and the rest of the space was largely vacated.
I could reimagine it as a shopping center. But I think it has a lot better value proposition by filling a need for housing. We’re working with a homebuilder on that site today to provide a great community asset: new homes with some retail remaining, but better quality retail.
Q. And in Pleasanton?
A. We’re probably going to do rental housing. But we might keep the Nordstrom building and do it as commercial space for life sciences. The building looks like it could adapt pretty well to a lab/office setup. Or we might tear the building down to build residential with structured parking.
Q. And Santa Barbara?
A. We always thought about residential. But we’ve got some retail users for the ground floor. We have some office users for the second and third floors. The community would like us to add some housing. So we’re trying to figure out if we can make it work. I’m not comfortable with that yet. But it’s an interesting exercise for us.
Jonathan Lansner is the business columnist for the Southern California News Group. He can be reached at jlansner@scng.com
]]>
https://couponspreview.com/blogs/feed/the-journey-begins2023-06-14T21:13:51-04:002023-06-14T21:13:51-04:00The Journey Beginsadmin
In the end, I packed like ten pairs of shoes. There are the pickleball shoes, several pairs of sandals in various colors, while the same holds true for my Sketchers casual shoes. One blue and one black. Water shoes along with water sandals. Hiking shoes which I broke in yesterday. Yup, just counted them in the closet as I did not want to be exaggerating. Looks like ten to me.
It is no exaggeration to say that it is darn pleasant outside. In fact, as I type, the bedroom windows are open, as is the door to the screened porch. We played a whole lot of pickleball this morning and were barely tired, which at first I did not get and then on second thought, duh....I am not dying of heatstroke!
My space planning husband decided that instead of the desk being parallel with the wall, let's go perpendicular allowing both of our computers to fit. So far, so good!!
I'm getting ahead of myself though, so let's go back to Orlando and do a quick run-through on the journey to arrive at this point. We began by setting things on the bed in the second bedroom. Not a whole lot because for the most part we needed to wait and pack at the last minute. Clean laundry for one thing.
For Christmas Fallon gave us the game you see called "I should have known that" which we played on the way up while driving on familiar roads. Honestly, that kind of game can make a person feel very DUMB! Every now and again, together we would get all four answers correct on the card, although not often enough that's for sure! Still we carried on because if you can't look dumb with the one you love there could be larger problems involved. :)
The largest box had all manner of kitchen items, including the air fryer, some groceries and my saute pan which I cannot live without. I did bring my OXO brand potato peeler as well as hand can opener because those too, are kitchen items I cannot do without. Santoku knife, pretty much the only knife I use aside from a bread knife. A sharpener for said knife was packed as well. The kettle made the cut although the toaster was left behind. Once one uses an electric kettle, nothing else will do. Thanks to our son-in-law Tom who introduced me to the wonders of that fantastic appliance.
And here we are all ready to go. We left our bikes behind as well as the kayak. I figured riding with any elevation was not happening and there are kayaks here at Charlotte's Cottage to use.
Driving early on a Sunday works very well should you need to store that information away. Barely any traffic and because we have now done this drive three times, we've got it down. This time though, we did take a slightly different route which took us through a town in Georgia where I saw this mural,
I'd looked into that park for camping in the past; for some reason it was not a go however we did decide to go out of our way to visit there because we were so close. They've got farm animals,
I was so bummed because one moment it was there and the next it had disappeared into the grasses. I can't be sure, but having used my Merlin app earlier, it claimed that there were Bob Whites within hearing and I was so hoping to see one. We had some leftover pizza in our cooler which is what we ate at a lakeside picnic table and while I roamed around Bruce put his phone on the sound identification and there were a whopping 17 types of birds! Oh yeah baby!!
We carried on until we arrived at The Rockwell House again. Why mess with a good thing, right? Bruce caught a few fish, we watched the Championship Sunday and did a little property roaming. Unfortunately the lighting was not as favorable on this visit, not to mention lots more leaves on the trees, making bird sightings more difficult. One thing I noticed this time was, whereas before I thought this design was painted on, I discovered they were individually cut out which makes them even more interesting.
Once again we had the whole house to ourselves. For $160 a night, it is a real bargain!
After an early start, we stopped in one of the cutest towns in the state, Madison, GA is a place we have been through before and I wanted to make sure and see it again. This time we went in search of a late breakfast and actually came up short. Instead we had a super early lunch here:
Chili was one of the sides! My Italian sub lasted us for the next day or so it was so big. Thank God for the cooler! Really yummy as were the baked goods I got from this amazing pastry shop.
It makes me giddy with gladness when the mountains come into view. Turning onto the nearly final stretch on US 19, we stopped at a winery for Bruce to take a little siesta. Your roving blogger roved. Camera in hand of course.
Yahtzee, Canasta set, a jigsaw puzzle and cards, several decks worth. Before leaving we'd been playing a marathon game of Canasta using my vintage set from 1954.
As to the deer that Laura promised we would see, it is happening in a big way. It happened on the first night when I was looking out from the screen porch and what to my wondering eyes should I see? At least five of them!
It is all shaping up very nicely indeed. We very much miss our friends and family already but I'm not going to lie, we are liking this place a lot already. More adventures to recount but for now I will bid you a fond adieu.
your friend,
Gail
]]>
https://couponspreview.com/blogs/feed/meet-the-biggest-and-most-bizarre-skink-ever-found-in-australia-it-became-extinct-47-000-years-ago2023-06-13T21:13:52-04:002023-06-13T21:13:52-04:00Meet the biggest and most bizarre skink ever found in Australia. It became extinct 47,000 years agoadminKatrina Kenny, Author provided
Many of the giant marsupials and birds that roamed ancient Australia had vanished by 40,000 years ago. While the duration and drivers of these extinctions remain debated, fossils clearly show the continent lost a host of creatures which would have dwarfed humans, such as short-faced kangaroos, diprotodons, “thunder birds” and giant goannas.
Our study published today in Proceedings of the Royal Society B suggests these end-Pleistocene extinctions also affected smaller creatures such as lizards. These animals comprise most of biodiversity and biomass.
A bizarre giant among tiny lizards
The most diverse land vertebrates in modern Australia are skinks, which are typically the tiny, nondescript brown lizards that scurry among leaf litter.
There are some larger and more charismatic forms, such as blue-tongues and shinglebacks (also known as sleepy lizards or bobtails). However, even these are dwarfed by our new fossil skink, Tiliqua frangens (or Frangens), which was more than 60cm long and weighed more than 2kg. This 1,000 times heavier than your typical garden skink.
Frangens was bizarre in many ways: it was covered in very thick, spiky armour and had an extremely wide but blunt skull. Frangens was an enlarged and exaggerated version of its closest living relative, the shingleback, which has these traits but to a much lesser degree.
A pair of Tiliqua frangens, the giant armoured skink, shown for scale next to a typical living skink, Lampropholis guichenoti (bottom right). Based on its closest living relatives such as shinglebacks and blue-tongues, Frangens would most likely have had a blue tongue, and might have exhibited pair bonding.Katrina Kenny, Author provided
While our large mammalian and avian megafauna are well studied, smaller fossil lizards and snakes are often overlooked. Most of the fossils used to piece together this extinct critter have been sitting in museum collections for decades - some for more than a century.
A jigsaw puzzle with pieces scattered all over Australia
The first two pieces of this creature, a partial lower jaw and skull-roof bone, were found separately in spoil heaps at Wellington Caves, about 200km west of Sydney in 1995 and 2008. These fragments were scientifically described as different species in 2009 and 2012.
Then in 2016, palaeontologists from Flinders University began finding more fossils of a large skink in Cathedral Cave at Wellington Caves. Frangens immediately stood out not just for its unusual size, but for its spikey body armour, abundant in the dig site yet oddly never reported before.
[TAG2]Cathedral Cave, Wellington Caves. The fossil dig, where many of the Frangens remains were found, is located to the left of the large brightly-lit stalagmite. The lizards (and other surface creatures) fell into the cave through a now-closed roof entrance, and were unable to get out.Diana Fusco, Author provided
A study tour of the palaeontology sections of the Australian, South Australian and Melbourne museums brought to light the importance of their collections. Sitting in drawers of unidentified reptiles were near-complete jaws, perfectly preserved braincases, and chunks of fused armour plating from the head of Frangens.
The Queensland Museum had put aside a specimen representing most of a single individual, waiting for someone with the patience and expertise to piece it together.
It became clear the original lower jaw and skull roof, plus all the subsequent material, belonged to a single species.
This wealth of fossils also broadened our understanding of the spatial and temporal range of this highly distinct lizard. Frangens fossils have been recovered from southeastern Queensland through to the northern banks of the Murray River in New South Wales. The fossils range in age from at least 2 million years to 47,000 years old. So Frangens was part of the fauna when the First Peoples arrived.
[TAG3]T. frangens was a heavy-set shingleback, much wider than living blue-tongued lizards and with giant spiked scales to protect it from predators while it foraged in the open.Author provided
A lost lizard that functioned more like a tortoise?
Australia has never had small land tortoises. Tortoises are completely absent in modern Australia, while the famously large meiolaniid turtles are extinct.
It is possible that in Australia, the heavily armoured, slow-moving Frangens filled the ecological niche that small tortoises occupy on other continents.
The shingleback or sleepy lizard (Tiliqua rugosa) is the nearest living relative of the giant armoured skink T. frangens, and shares many similarities.Michael Lee, Author provided
Intriguingly, in none of the fossil sites we have explored, do Frangens and the modern shingleback co-occur. Instead, only after Frangens went extinct did shinglebacks expand northward and increase in size: those ranging from the Murray to southeastern Queensland are among Australia’s largest living skinks (reaching up to 1kg).
Nature abhors a vacuum, so these shinglebacks might be growing big to fill the gap left by Frangens, which in turn previously filled the gap caused by the absence of small tortoises.
Furthermore, Frangens was not alone, but was part of a cohort of giant skinks, none of which survived past the end-Pleistocene extinctions.
These fossils show that the extinctions were not confined to “megafauna” – the largest examples of the largest groups. Rather, even some smaller animals such as skinks once had (relatively) large forms, which perished in the late Pleistocene along with giant marsupials and flightless birds.
Mike Lee receives funding from the Australian Research Council, Flinders University and the Royal Society of South Australia
Diana Fusco received funding from the Maxim Foundation and the Royal Society of South Australia, and was supported by an Australian Research Training Program stipend for this project. The Cathedral Cave project was initially funded by the Australian Research Council.
Kailah Thorn received funding from the Royal Society of South Australia, and was supported by an Australian Research Training Program stipend for this project.
]]>
https://couponspreview.com/blogs/feed/maga-parody-account-is-so-good-that-many-people-think-its-the-real-deal2023-06-13T15:13:49-04:002023-06-13T15:13:49-04:00MAGA parody account is so good that many people think its the real dealadmin
MAGA cultists' idolatry of their god emperor is so over the top that it's hard to tell when someone is parodying them. Take Gary Peterson, for example. His Twitter bio looks a lot like a typical Trump worshipper, complete with a John Wayne jigsaw puzzle background:
"Patriot.
— Read the rest ]]>
https://couponspreview.com/blogs/feed/spy-tech-unshredding-documents2023-06-12T15:13:50-04:002023-06-12T15:13:50-04:00Spy Tech: Unshredding Documentsadmin
Bureaucracies generate paper, usually lots of paper. Anything you consider private — especially anything that could get you in trouble — should go in a “burn box” which is usually a locked trash can that is periodically emptied into an incinerator. However, what about a paper shredder? Who hasn’t seen a movie or TV show where the office furiously shreds papers as the FBI, SEC, or some other three-letter-agency is trying to crash the door down?
That might have been the scene in the late 1980s when Germany reunified. The East German Ministry of State Security — known as the Stasi — had records of unlawful activity and, probably, information about people of interest. The staff made a best effort to destroy these records, but they did not quite complete their task.
The collapsing East German government ordered documents destroyed, and many were pulped or burned. However, many of the documents were shredded by hand, stuffed into bags, and were awaiting final destruction. There were also some documents destroyed by the interim government in 1990. Today there are about 16,000 of these bags remaining, each with 2,500 to 3,000 pieces of pages in them.
Machine-shredded documents were too small to recover, but the hand-shredded documents should be possible to reconstruct. After all, they do it all the time in spy movies, right? With modern computers and vision systems, it should be a snap.
You’d think so, anyway.
Shield and Sword of the Party
The Stasi has been likened to the Soviet KGB. Using civilian informants, they contributed to the arrest of about a quarter of a million people between 1950 and 1990. They also had extensive files, and if they survived the destruction, people can ask to see the information the Stasi collected about them.
The agency was known for pervasive and invasive spying, with agents in every apartment building and all major companies. At the time they disbanded, the agency had over 90,000 employees and nearly 175,000 informants. This works out to one secret policeman for every 166 East Germans. By contrast, the Gestapo had one agent for every 2,000 people. They were also known for harassing enemies of the state. If you want to learn more about the Stasi, Deutsche Welle has an interesting short documentary about the agency and its spying activities that you can watch below.
So you can see why the Stasi leadership wanted to destroy files. Citizens occupied the Stasi offices, but not before about 5% of the documents — 1 billion sheets of paper — were destroyed somehow. As the German Democratic Republic fell, many citizens protested the destruction of the papers, primarily to ensure there was evidence to prosecute wrongdoing in the agency. However, some informants wanted the documents destroyed so they would not be identified.
The new government appointed an office to control the records, but there was a strong debate about what to do with them. Some wanted them sealed or destroyed. Others wanted them used for prosecution. In the end, the Unification Treaty allowed people to access their own files starting in 1992. Between 1991 and 2011, about 2.75 million people have requested to see their files. Near relatives can also request the files of deceased or missing persons. The media and schools can access documents that are redacted for personal information. The archive is now the responsibility of the Federal Archives.
Reconstruction
However, there are still these 16,000 bags of fragments — about 45 million pages worth. In some cases, the destroyed files had pages simply torn in half or quarters. Those are the easy ones, but they do not all fall into that category. The 36 archivists tasked with reconstruction processed 327 bags in 13 years, not a speedy record.
To help, the German government turned to computers and the Fraunhofer Institute. Scientists there demonstrated software known as e-Puzzler that would revolutionize the document reconstruction process. However, that turned out not to be the case. While it does work, the process is painfully slow.
In theory, it makes sense. An article in The Guardian from 2007 describes the machine. According to the article:
The machine works by scanning the document fragments into a computer image file. It treats each scrap as if it is part of a huge jigsaw puzzle. The shape, colour, font, texture and thickness of the paper is then analysed so that eventually it is possible to rebuild an electronic image of the original document.
Some marketing material from Fraunhofer itself says, “The system uses an adaptive, non-deterministic workflow to process a wide range of characteristics, such as the contour, color, writing, and lines of the fragments.” Seems plausible. You can see the system in action in the video below. That video also notes some of the possible reasons the project has been a failure.
So What Went Wrong?
It isn’t clear why this isn’t feasible. The Fraunhofer system did help Bundesbank match up damaged banknotes. However, banknotes are more uniform and have known features that the Stasi documents lack. And, as you can see in the video below, it still looks like there is some manual work required. Despite putting in about 6.5 million euros, the official word is the process didn’t scale well for this many documents.
On the one hand, you have to imagine that computers and image processing has come a long way since 2013. It is surprising you couldn’t do much better with modern hardware and techniques. Of course, if you were conspiracy-minded, you might wonder if someone doesn’t want the project to succeed.
To be fair, opening the bags is a chore. Archivists try not to disturb the order of the papers and they often contain trash which we are sure is pretty disgusting after all these years. Some papers have clips or staples and many are wrinkled. The machine needs the pages separated and flattened. To help speed up the process, each piece destined for the machine has to be about 2 cm square or larger. The downside is the documents are two-sided, which doubles the number of trips for each piece.
We get it. Building one radio is easy. Building 16,000 of them is hard. We know people can unshred documents that aren’t reduced to dust or ash. Even the crosscut shredder isn’t foolproof if you have the right open-source software. The Iranians famously employed carpet weavers to reassemble documents taken from the US embassy in 1979. You can hear more about some of these cases in Edward Robinson’s CHCon presentation in the video below.
What’s Next?
We suspect the Stasi files will remain shredded and unread for a long time, but maybe not entirely for technical reasons. We also imagine since DARPA has sponsored challenges for unshredding, that someone — maybe a lot of someones — has some great tech for this that they aren’t making public.
If you are worried the secret police are listening –and not just Google and Amazon — you need an NLJD. If you like cold war intrigue, how about the adventures of stealing a moon capsule?
]]>
https://couponspreview.com/blogs/feed/the-kingdom-of-breckenridge-the-story-of-the-mountain-town-s-first-viral-tourism-campaign-and-how-it-helped-shape-its-celebratory-legacy2023-06-12T03:13:51-04:002023-06-12T03:13:52-04:00The Kingdom of Breckenridge: The story of the mountain town’s first ‘viral’ tourism campaign and how it helped shape its celebratory legacyadmin
The town of Breckenridge has long served as a highly sought-after travel destination. From a bustling main street that captures the tangible spirit of the American West to nearly 3,000 acres of ski terrain spread across the numerous peaks that serve as its backdrop, the town is a crown jewel of Colorado’s High Country.
But nearly a century ago, Breckenridge’s landscape was a far cry from the vibrant tourism community it is today. Having seen the end of gold and silver booms and amid the grip of the Great Depression, the area’s dwindling population was in dire need of rejuvenation.
“Breckenridge was suffering at that time,” said Larissa O’Neil, executive director of the nonprofit Breckenridge History, which was formally the Breckenridge Heritage Alliance.
According to Summit Historical Alliance board president Sally Queen, this is a time that also predates the town — and the county’s — status as a ski destination. Arapahoe Basin was the county’s first ski area to open in 1946 followed by Breckenridge in 1961.
“It’s still a fairly isolated community,” Queen said of Breckenridge. “There is still mining going on but not at the level of the late 19th century, early 20th century.”
When the town was searching for its next identity after the allure of gold and silver had run dry, it was during this era that a women’s club came across a map. With it an idea formed that would turn into a spectacle for generations to come.
In 1936, women in this club, which consisted of the “movers and shakers” of the time, according to O’Neil, discovered a map from 1880 that contained a “donut hole” mistake. Amid the jigsaw puzzle of treaty lines showing the westward expansion of the United States — remnants of conflicts including the Mexican-American war, the annexation of Texas and the Louisiana Purchase — Breckenridge was missing entirely.
“These women took this map, and they ran with that. They ran with it big time,” O’Neil said, adding it would amount to what she called one of the first “viral” campaigns for the area.
Since it did not appear as part of the United States, the women’s group claimed Breckenridge was an independent territory and used the gimmick to establish the first “No Man’s Land” festival, which was hosted Aug. 7, 1936, according to O’Neil.
The event brought together dignitaries and politicians, including Colorado Gov. Ed Johnson — who shares his name with President Dwight D. Eisenhower on the Eisenhower-Johnson Memorial Tunnel — as well as navy officers and officials of neighboring municipalities. A brass band performed outside the county’s courthouse building on Lincoln Avenue as the Colorado flag was raised into the air and Gov. Johnson officially welcomed Breckenridge into the state of Colorado.
A crowd surrounds the Summit County courthouse building during a 1936 flag-raising ceremony that would kick off years of “No Man’s Land” celebrations.Denver Public Library/Courtesy photo
Theories of an independent Breckenridge were soon debunked after a state historian that same year provided evidence of maps marking the town. Maps currently on display at the Summit Historical Society museum in Dillon even show Breckenridge prior to Colorado’s founding as a state, with one from 1861 showing the town as part of Summit County, back when the area was a territory and when the county used to encompass all of what is now northwest Colorado.
But for those who had turned the mistake into cause for celebration, it didn’t matter. “No Man’s Land” was “so wildly successful” that iterations of the festivities continued yearly up until 2000, O’Neil said. Meanwhile, in the 1960s, a similar event began that served as a sort of “spin off” to that same gimmick.
What many residents and tourists now know and love as Ullr Fest, an annual celebration of “all things winter and snow,” first began as Ullr Dag in 1963. It was during this celebration that Breckenridge rebranded itself as “The Kingdom,” a reference to the 1880 map that neglected the town.
A 1964 flyer for the second-annual Ullr Dag festival, later renamed Ullr Fest. Summit Historical Society/Courtesy photo
Stepping even further into its unabashed tourism ploy, the town featured a king and queen, posted checkpoints where visitors were required to show Visas and even minted its own currency — much to the ire of the U.S. Treasury Department, which quickly stepped in to denounce the fake money, according to O’Neil.
Nonetheless, “The Kingdom” and the celebration built around it “became an identity for Breckenridge for years,” O’Neil said.
Today, remnants of that legacy live on such as the aptly named Kingdom Park, located just north of the town’s main street off U.S. Highway 9, as well as in its general spirit for festivity.
For Queen, the Summit Historical Society board president, the events “helped establish Breckenridge as that location that has great festivals,” from Ullr Fest to the more recently established International Snow Sculpture Championships.
And Summer 2023 is no different thanks to a jam-packed lineup of festivities for locals and visitors. Those include the town’s Independence Day celebration, bacon and bourbon hogfest, beer festival, food and wine festival and Breck Epic — a multiday mountain bike race held in and around the backcountry surrounding Breckenridge.
An 1861 map shows Breckenridge included in United States territory prior to Colorado’s founding as a state in 1876. Summit Historical Society/Courtesy photo
For those wanting to learn even more about Breckenridge’s history, they can make a visit to the historical society’s Dillon Schoolhouse Museum, located in an original homestead schoolhouse, as well as Breckenridge History’s Barney Ford Museum, located in the home of a Black civil rights pioneer.
“I think that the whole idea of The Kingdom and No Man’s Land is a fun, quirky part of our past that relates to who we are today,” O’Neil said.
See and experience history
To enjoy and learn the rich history of Breckenridge and Summit County, stop by one of the county’s nonprofit museums that feature authentic memorabilia of the area’s storied past — including remnants of No Man’s Land and The Kingdom.
Barney Ford Museum
Location: 11 E. Washington Ave., Breckenridge
Hours: 10 a.m. to 3 p.m. Tuesday through Sunday, closed Mondays
Dillon Schoolhouse Museum
Location: 403 La Bonte St., Dillon
Hours: 11 a.m. to 1 p.m. Tuesday through Saturday, closed Sundays and Mondays
Frisco Historic Park and Museum
Location: 120 E. Main St., Frisco
Hours: 10 a.m. to 5 p.m. Wednesday through Sunday, 12:30 p.m. to 5 p.m. Tuesdays, closed Mondays
]]>
https://couponspreview.com/blogs/feed/magic-puzzle-company-series-three-jigsaw-puzzles2023-06-11T21:13:52-04:002023-06-11T21:13:52-04:00Magic Puzzle Company “Series Three” Jigsaw Puzzlesadmin
It seems like cartoony jigsaw puzzles ~with a twist~ is all the rage these days. The most popular examples I know of are those ✨magical ending✨ puzzles by the Magic Puzzle Company, followed by the similar-looking Odd Pieces puzzles that you may have seen ads for on YouTube and elsewhere lately, each of which give you a fun little mystery to solve.
The fact that the Magic Puzzle Company released a Series Two trio of puzzles at the beginning of 2022 somehow slipped under my radar, and then it happened again when Series Three came out at the beginning of this year. Well, I may be late to the party, but better than never, as they say…right?
Like the original set, these puzzles are full of tiny whimsical details and easter eggs for you to discover and enjoy as they’re being assembled, and each one does a “magic trick” when you finish it.
No, it doesn’t like, sprout wings and fly around or anything like that — these are merely cardboard jigsaw puzzles, after all. But there is something of a surprise awaiting you at the end of each one, and you’ll need to solve it for yourself if you want to find out what it is.
]]>
https://couponspreview.com/blogs/feed/behind-the-scenes-at-heesen-yachts2023-06-07T09:13:51-04:002023-06-07T09:13:51-04:00Behind the Scenes….at Heesen Yachtsadmin
It’s not every day you’re presented with the opportunity to visit the headquarters of one of the world’s leading super yacht builders so when the kind and very exciting invitation to join the team at Heesen Yachts landed in our inbox naturally we jumped at the chance. Join The Luxury Editor’s, Chrystal, as she ventures behind the scenes at Heesen Yacht’s impressive shipyard. Read on to discover more.
Heesen Yachts
Established in 1978, by Frans Heesen, Heesen boasts one of the world’s most impressive shipbuilding legacies, with an unrelenting focus on quality, craftsmanship and innovation which produces some of the finest superyachts in the world.
Based in Oss, Holland – the home of yacht building – each Heesen superyacht is built in either aluminium or steel and uses proven engineering to deliver speed, style and fuel-efficient cruising.
The Heesen portfolio consists of three build concepts; i) Series ii) Smart Custom and iii) Full Custom with the owners’ preference in delivery time and level of personalisation dictating which concept is best suited to their needs.
Series: these yachts are fully engineered and designed ahead of time and available for sale during their construction. As they are built on speculation, delivery times are shortened however this means that customisation is limited and only possible for the interior and decks.
Smart Custom: these yachts are fully engineered above and below the main deck but can be offered with a custom designed superstructure and many other elements.
Full Custom: as the name suggests the owner is involved from the very start of the design process resulting in a truly unique yacht.
The Heesen client profile tends to fall within one of three categories:
Hospitality: larger yachts primarily used for parties, entertainment, corporate events and operated with a full crew. They tend to spend less time at sea than the other two client types.
Family: mid to larger-sized yachts, with a lifestyle focus for all the family. Spends quality time at sea.
Adventurer. This client buys a smaller super yacht, they visit far-off lands, and the yacht is used frequently. The owner tends to be an accomplished sailor and is younger than the other two client types. As the name suggests he/she enjoys an adventure.
Regardless of owner type or which build concept an owner chooses, with Heesen they are guaranteed a design that combines power and beauty as well as confidence and performance.
Super Yachts
A yacht is a vessel that has been designed for pleasure and is not linked to how it is powered which until recently I’d always was by sails. I suppose this is because my sailing experience was limited to the decks of a 42-foot Jeanneu sailing boat, winching the sails under my father’s command!
Officially, a super yacht is a yacht that is 24 metres or more and a mega yacht 80 meters or more in length – with Heesen producing its largest to date at 70 metres. The Galactica Super Nova is famed for its advanced technology, design, and speed – it is one of the fastest superyachts in her class in the world. This nautical beauty also enjoyed life in the limelight when Beyonce and Jay-Z celebrated their birthdays onboard the motor yacht.
The super yacht market is a niche one, as indicated by Heesen’s entry-level price tag of 100 million euros. With approximately only 7,068 people of the global population of UHNWIs having more than USD 500m net worth (2021), the pool of eligible candidates remains quite small. Following studies made by SuperYacht Times there are approximately 5,396 yachts within the global super yacht fleet (of 30+ metres) in operation (2021) – although the growth rate since 2012 is 12%.
Source: The State of Yachting 2022, SuperYacht Times July 2022
These are impressive facts and figures which were about to become even more meaningful as I ventured on my very own Heesen experience.
The Heesen Experience
We (six journalists) arrived at the impressive and expansive shipyard in Oss (approx. 1.5 hours’ drive) from Amsterdam and made our way into the sleek reception area we were greeted by the team, issued a safety briefing guide and fitted with our safety shoes (more on this later) before making our way to the equally sleek board room.
Market Insight
We received a warm welcome from Arthur Brouwer, CEO at Heesen Yachts, who introduced the company and some of his senior team members. The board table was laid out with Smythson notepad, premium welding gloves and a selection of handmade chocolates. A considerate and quality touch.
Following a fascinating presentation on Heesen and the superyacht market we were then given the opportunity to take a seat at the design table where we joined Frank Laupman, Yacht Designer of Omega Architects. Frank spent much of his career (20 years+) working alongside Heesen and is now an independent designer who collaborates with the super yacht company. Frank’s attention to detail and intuition for design, quality and nautical expertise are exceptional. He is a true master of his trade!
Design Process
To gain a deep understanding of how the design process works, as well as a full appreciation for the capabilities of Heesen, we were asked to take part in a workshop where each of the group members were given a persona from part of a wealthy family and asked to design a yacht that would suit everyone’s whims. Each member had their own requirements – all of which had to be factored into the overall design and build. For example, I was the ‘daughter’ who had just achieved her pilot licence so needed a place to land a helicopter, my father was an ex-Olympic swimmer, so a pool was on his wishlist, whilst my brother was a fashion designer who demanded a catwalk; to name just a few. Although this role play activity was super-fun the key-takeaway from the process was simply anything is possible! The team are so knowledgeable, experienced and innovative that they can make their clients’ sea-faring dreams a reality.
This was followed by a lesson in seaworthiness and how to test the design to see how it would fare on the water. It starts with a beautiful, handcrafted model of the vessel which then undergoes stringent tests and analysis around weight, displacement and many more technical aspects that I won’t even begin to describe. It was mind-blowing!
Work in Progress
Heesen produces only a few fully custom yachts at a time and after a tour of the shipyard, it is clear to see why. The level of planning, detail, manufacturing and manual resources that goes into the production of a super yacht was, for a layman such as me, beyond comprehension. Each piece of the super-size jigsaw was given the utmost care and attention.
To keep the team on track each project has a clock counting down the number of years, months, days, hours and seconds until delivery.
We then met some of the welding team, who talked us through their part in the construction – again the passion and pride they take in their work was more than obvious. We even attempted to master the art ourselves; best is to say I won’t be giving up my day job!!
Delivery Time
After the manual work was over, we met with Perry Van Hirtum, Manager of Interior Design at Heesen. What a job! Perry led us through a visit of a completed semi-custom yacht that is due to be delivered to a client. With our shoes securely covered we were guided through this unique vessel for a special preview. It was a truly breathtaking experience.
For privacy reasons, we couldn’t take any pictures on-board but take my word for it – everything from the owner’s suite to the crew cabins (and every detail in between) were of exceptional quality, style and design.
Super by Name. Super by Nature
Our visit to the shipyard was a truly memorable experience which has given me a full appreciation of why these stunning sea-faring vessels hold the title of super yachts.
Friends of Heesen Yachts
The day before our tour of Heesen, we enjoyed some leisure time in Amsterdam, all kindly co-ordinated by our hosts at Heesen Yachts.
Our rendezvous point was the lively and hip area of Nieuwmarkt en Lastage where we received a warm welcome from the team including Mark Van Heffen (Marketing Director) who has been working at Heesen for more than 15 years. Despite his length of tenurewith Heesen he still possesses a freshness and zest for the brand which was matched by his knowledge and experience.
As we were unable to take to the waters on a Heesen Yacht (in our dreams!) the team had arranged for us to experience a tour of Amsterdam on a Wejer-38. Named Chill Out, she is a sleek looking 38ft day yacht that can easily power across the water at 45 knots. With a spacious walk-in aft, large three-person sun deck and a uniquely designed cockpit that gives the helmsman a perfect 360-degree vision.
Wejer and Heesen often collaborate together as they have similar values and clientele. Many of Heesen’s clients opt for a Wajer tender or day boat to run alongside their bigger pleasure boat.
Link to brand spotlight piece.
After our adventures on the Amsterdam canals had come to an end, we then took a short car journey to MOS Amsterdam – a fine dining, Michelin Star restaurant, located at the tip of the IJdok. With stunning views across Amsterdam and a bright and modern interior, it is a superb place to enjoy a refined yet relaxing dining experience. The restaurant was founded by partners Henry Pattiwael van Westerloo and Egon van Hoof in 2015 and it’s easy to see why it is such a popular choice with both regulars and new visitors to the city. The food, the service and the ambience is first class.
We enjoyed a tasting menu, that comprised five courses and show-stopping hors d’oeuvres, with delights such as; ‘Dutch asparagus with kohlrabi, cockles, razor clams and a light fenugreek hollandaise’ and ‘Lamb saddle and neck with a cream from Pierre Robert, muhammara, turnip and gravy with magnolia’. Each course was beautifully presented (in fact some looked too good to eat but we did!) and their beauty was only outshined by their flavour.
Final Thoughts
The two days I spent with the Heesen crew were absolutely brilliant – a hugely interesting, memorable and privileged experience!
Find Out More
To discover more about this internationally renowned superyacht builder visit their website.
]]>
https://couponspreview.com/blogs/feed/giant-tree-kangaroos-once-lived-in-unexpected-places-all-over-australia-according-to-major-new-analysis2023-06-07T03:13:50-04:002023-06-07T03:13:50-04:00Giant tree-kangaroos once lived in unexpected places all over Australia, according to major new analysisadminDendrolagus ursinus, or Goodfellow's tree-kangaroo.Shutterstock
Kangaroos are an enduring symbol of Australia’s uniqueness. To move, they do what no other large mammals do: they hop along on oversized hind legs. So you may be surprised to learn that some kangaroos live in trees, and are among the most endearing and threatened of all marsupials.
Today, biologists recognise ten tree-kangaroo species, all in the genus Dendrolagus. Two species inhabit tropical forest in far northern Queensland. The other eight live in New Guinea.
Studying them is difficult because their habitats are hard to access, they live high in trees and are increasingly rare due to human impacts.
The evolutionary history of tree-kangaroos is even more obscure. In a new study published today in Zootaxa, we pull together all the evidence on fossil tree-kangaroos and show giant tree-kangaroo species were widespread across Australia, and lived in habitats that were a long way from tropical forest – their modern-day home.
Reconstruction of the giant tree-kangaroo Bohra illuminata, Nullarbor region, 250,000 years ago.Peter Schouten, Author provided
Tree-kangaroos from the Treeless Plain
In 2002, a team of explorers found three new caves in the middle of the arid Nullarbor Plain of south-central Australia. The cave floors were littered with the bones of the extinct marsupial “lion” Thylacoleo carnifex and short-faced kangaroos, as well as those of several mammals, birds and reptiles that still live in drier parts of Australia.
Given the high diversity of herbivores, we concluded the Nullarbor had to have been more than just arid shrubland some 200–400 thousand years ago, even if it was still very dry. This is because a few shrubs would not have been enough for such a range of herbivores to live on.
In this light, it was hard to believe when we discovered partial skeletons of two new species of giant tree-kangaroo in 2008 and 2009. They belong to the extinct genus Bohra, first named in 1982 on the basis of leg bones found in the Wellington Caves in New South Wales.
Like the picture on a jigsaw box, we used the Nullarbor skeletons as a guide to search for isolated pieces in museum collections. We discovered more than 100 teeth and bones belonging to a total of at least seven species of extinct tree-kangaroos.
These come from fossil sites extending from southern Victoria to central Australia to the New Guinea highlands, and range in age from 3.5 million (late Pliocene) to a few hundred thousand years old (middle Pleistocene).
Skull of the extinct Bohra illuminata alongside that of a modern tree-kangaroo (scaled to same length).Author provided
A big leap forwards – and then upwards
Anatomical and molecular evidence shows that, among living marsupials, kangaroos are most closely related to possums. No one is sure exactly when the kangaroo ancestor made the descent to the forest floor, due to big gaps in the Australian fossil record.
Similarly, we do not know whether the distinctive “bipedal” hopping mode of locomotion originated in the trees or on the ground – but we do know it became the enduring hallmark of the kangaroo family. They have longer hind legs and longer feet than their possum ancestors, and the foot bones lock together in such a way as to limit sideways foot movement.
Combined with high tendon elasticity and a large muscular tail, these adaptations make kangaroos among the most energy-efficient movers on the planet.
The foot bones of tree-kangaroos reveal three stages in the evolutionary “reversal” of these adaptations. Pliocene species of Bohra evolved a broader heel bone and upper ankle joint, allowing them greater mobility. Later, Pleistocene species of Bohra evolved a smoother joint at the front of that heel bone, giving them the ability to roll the soles of their feet inward to wrap around tree trunks and limbs.
As well as shorter feet, modern tree-kangaroos (Dendrolagus) have shorter hindlimbs, in conjunction with powerful forelimbs and claws for grasping and climbing. They can even walk with their hind legs while climbing, whereas ground-dwelling kangaroos only move their hind legs alternately while swimming.
Comparison of tree-kangaroo (Dendrolagus) and grey kangaroo (Macropus) foot bones.Author provided
Why return to the trees?
As Australia dried out over the past 10 million years, more open vegetation became widespread. This trend was interrupted by a greenhouse phase 5–3.5 million years ago. We speculate that the temporary expansion of forest habitats during this period would have opened new ecological niches that early tree-kangaroos evolved to exploit.
By the time climatic drying returned, tree-kangaroos had become established members of the Australian fauna, with species adapting to expanding woodland and savannah habitats.
As some larger monkeys do today, species of Bohra probably divided their time between living in trees and on the ground, whereas modern tree-kangaroos spend most of their time in the canopy.
So, although we might now think of tree-kangaroos as quintessential rainforest animals, this is because the Bohra species that lived in other habitats have become extinct.
Despite everything we can learn about evolution from studies of modern species, the fossil record holds the potential to flip the script with one discovery.
Gavin Prideaux is a palaeontologist at Flinders University, and receives research grant funding from the Australian Research Council, Australia Pacific Science Foundation, Hermon Slade Foundation, National Geographic and Australian Geographic.
Natalie Warburton receives funding from Australia Pacific Science Foundation and has previously received funding from the Australian Research Council. She is a researcher in the Harry Butler Institute at Murdoch University, a Research Associate of the Western Australian Museum and the current Vice President of the Australian Mammal Society.


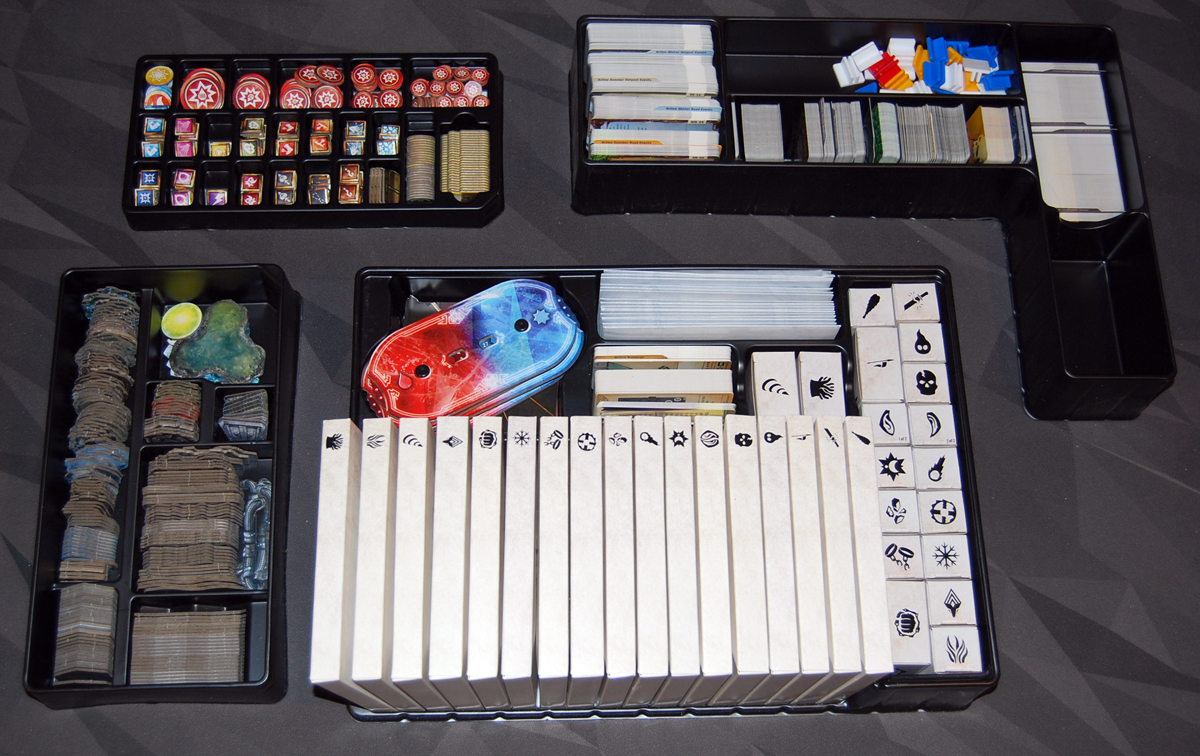
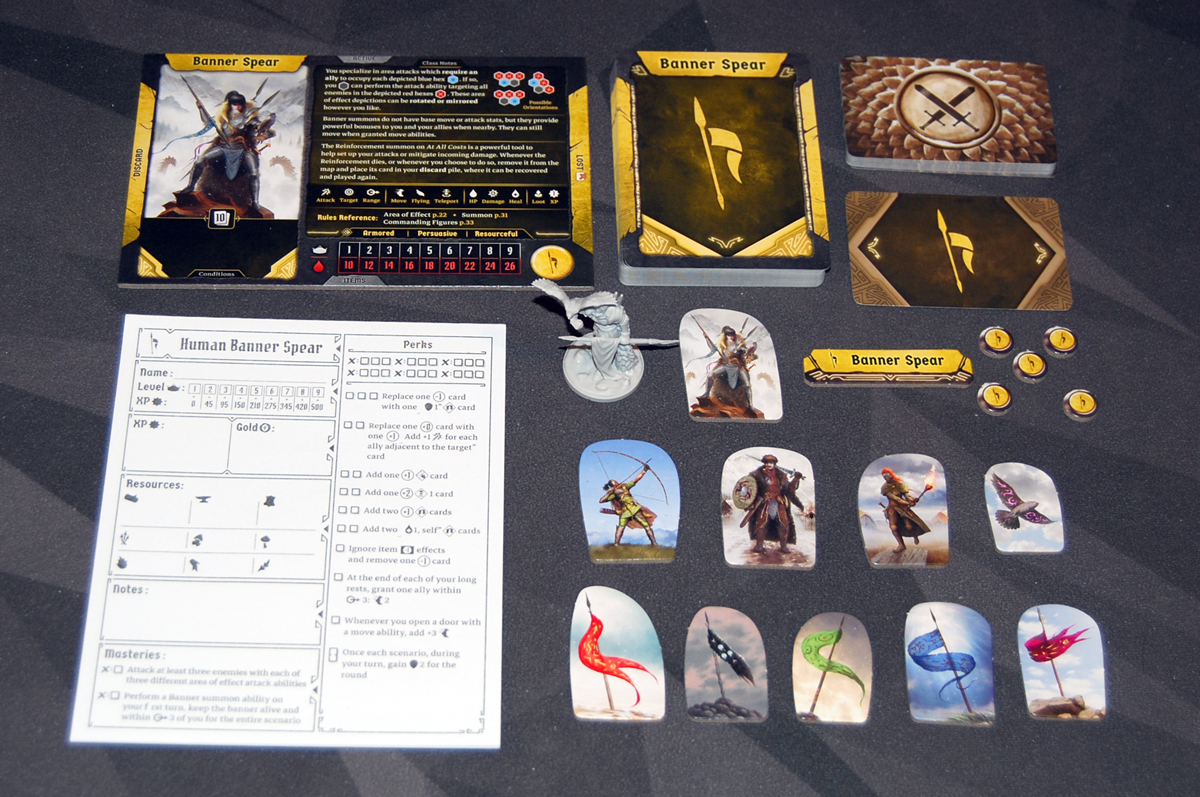
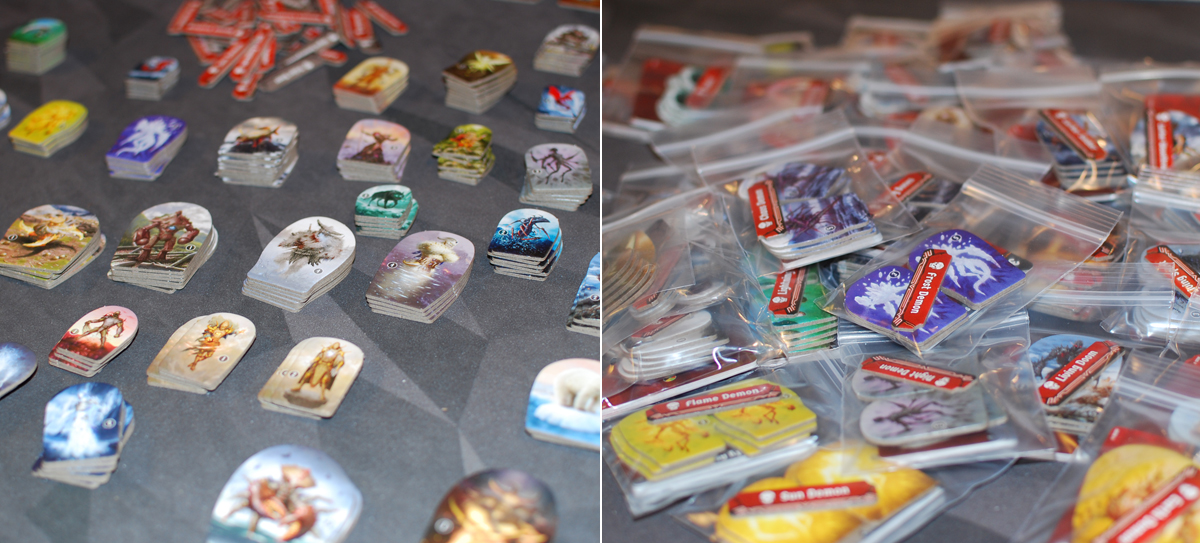
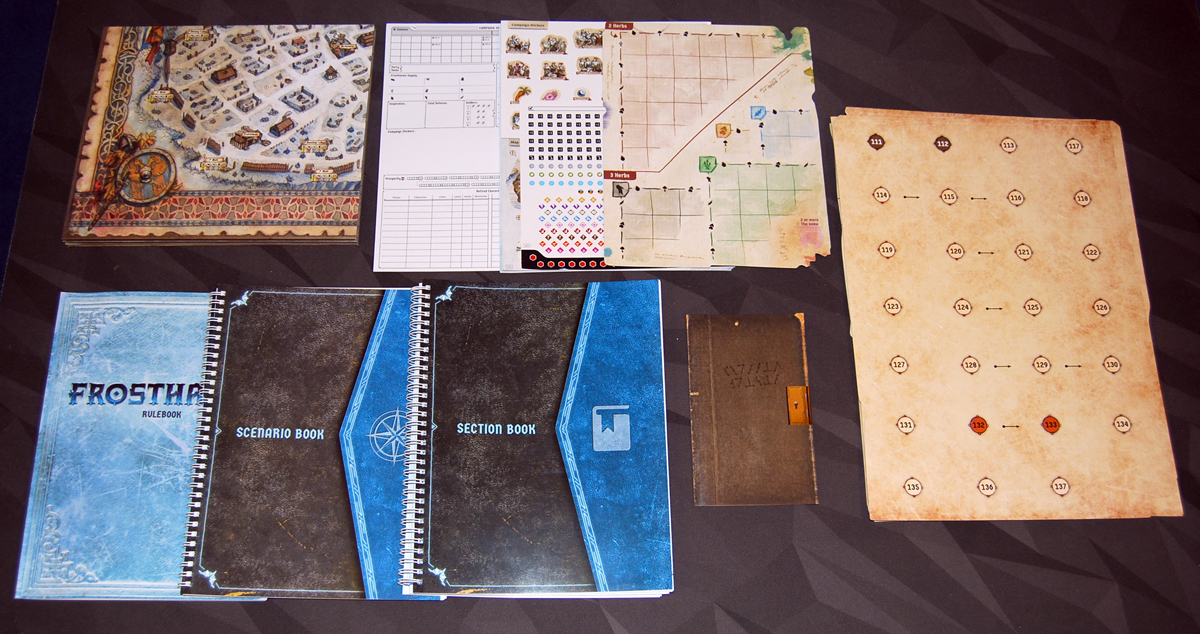
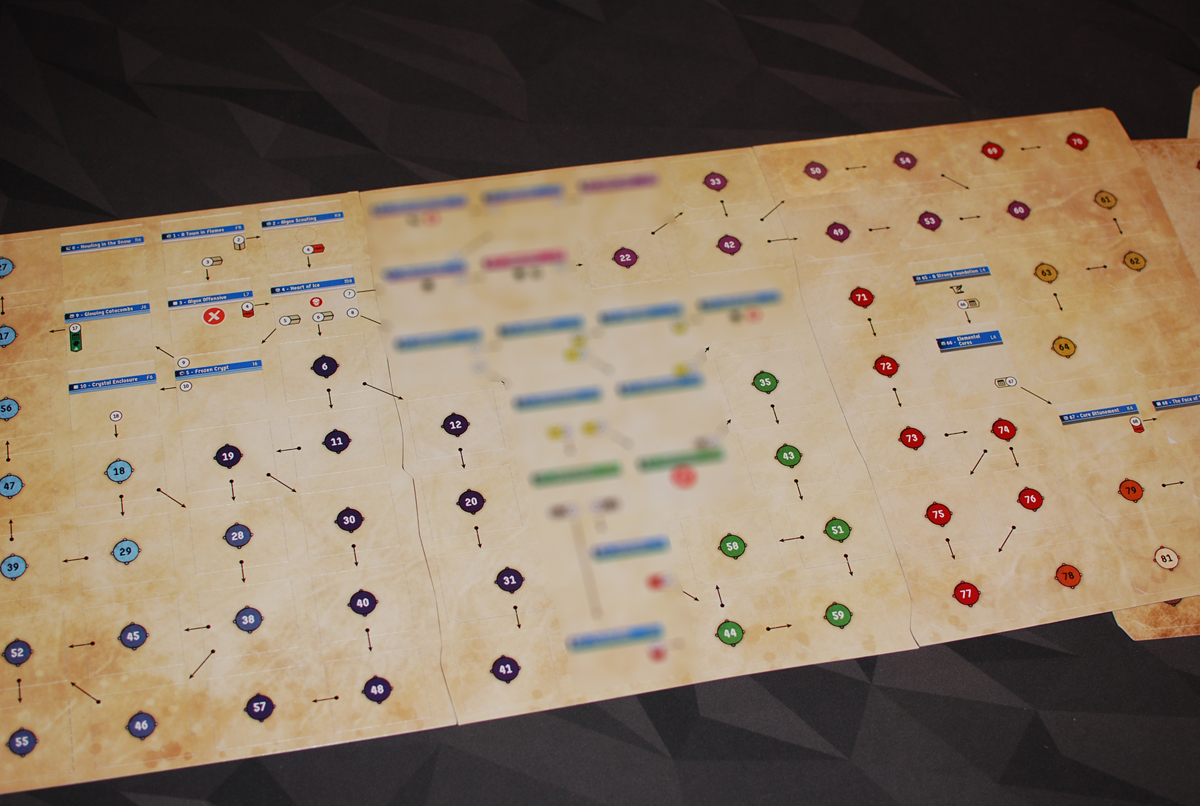

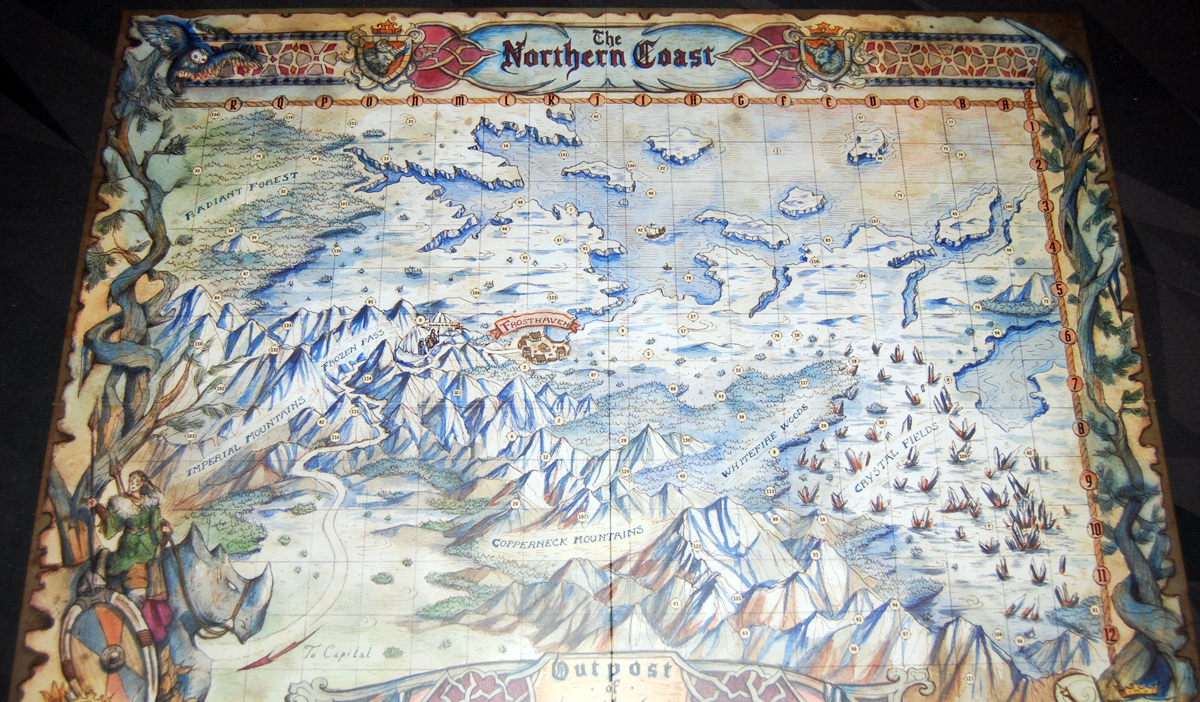
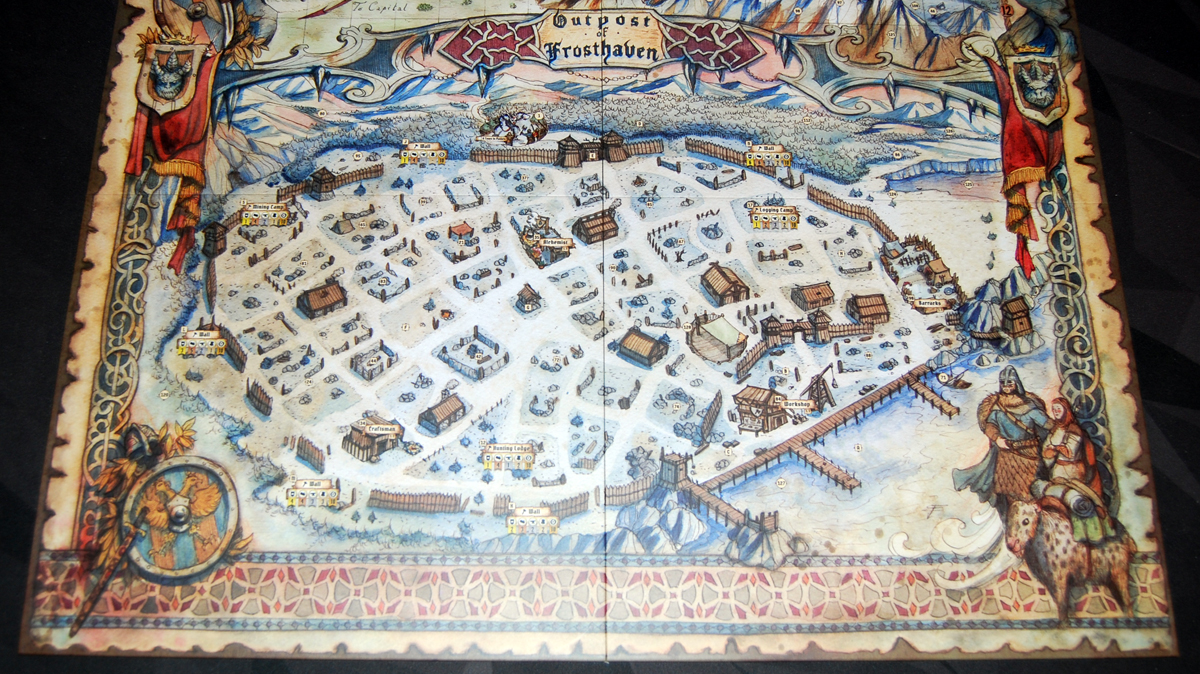

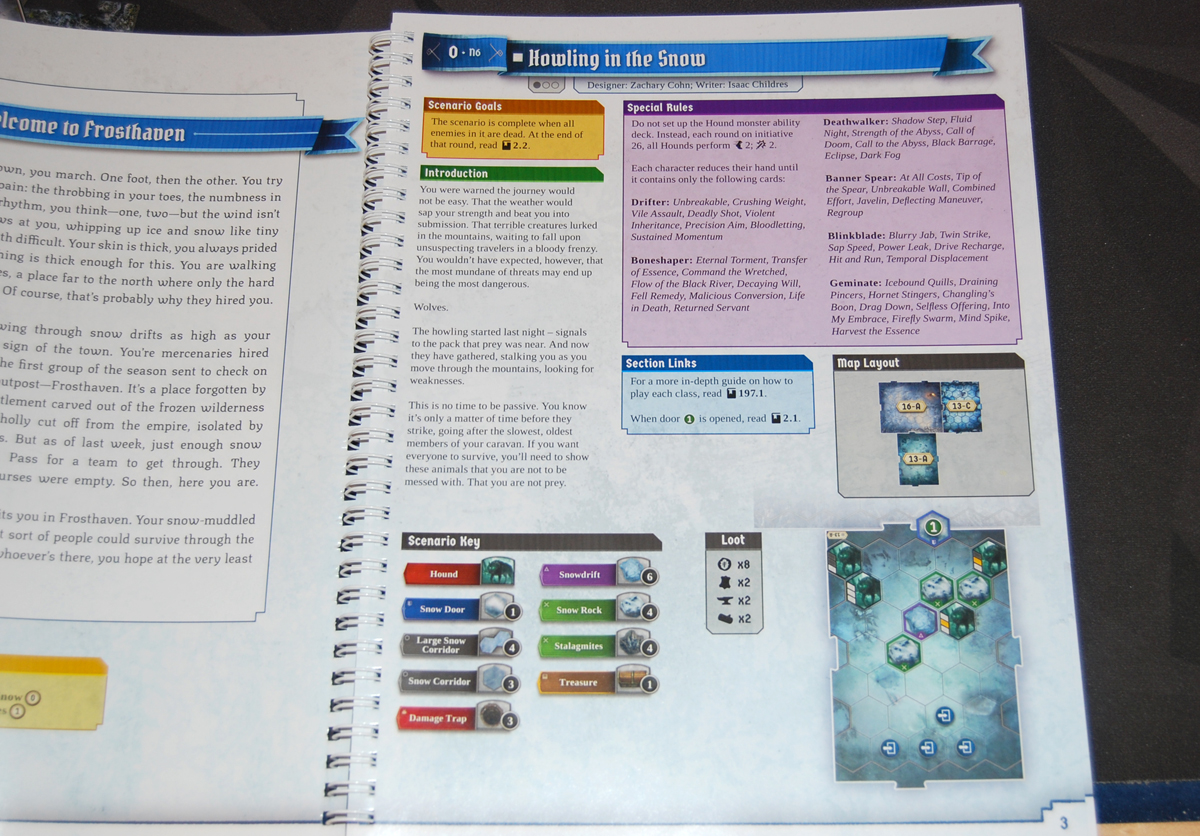
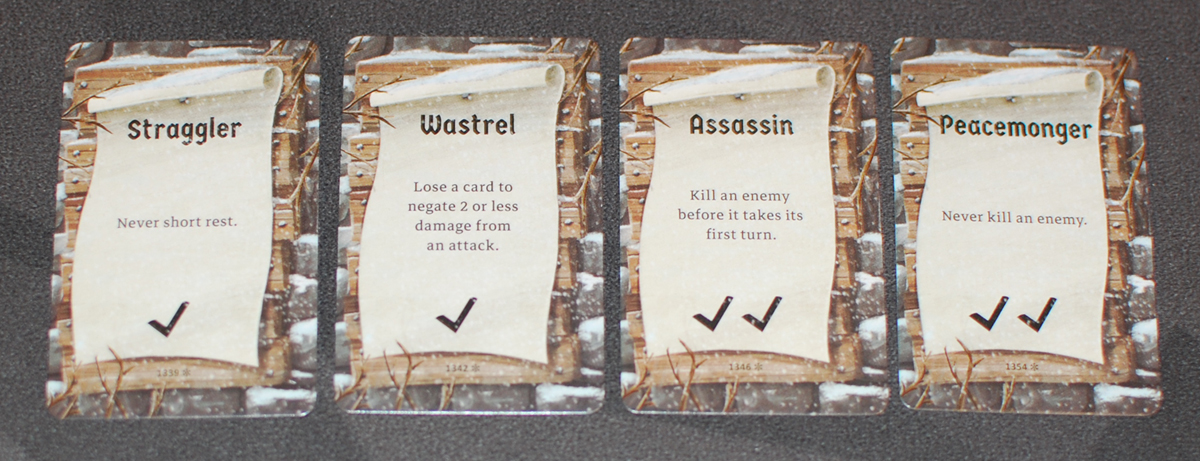


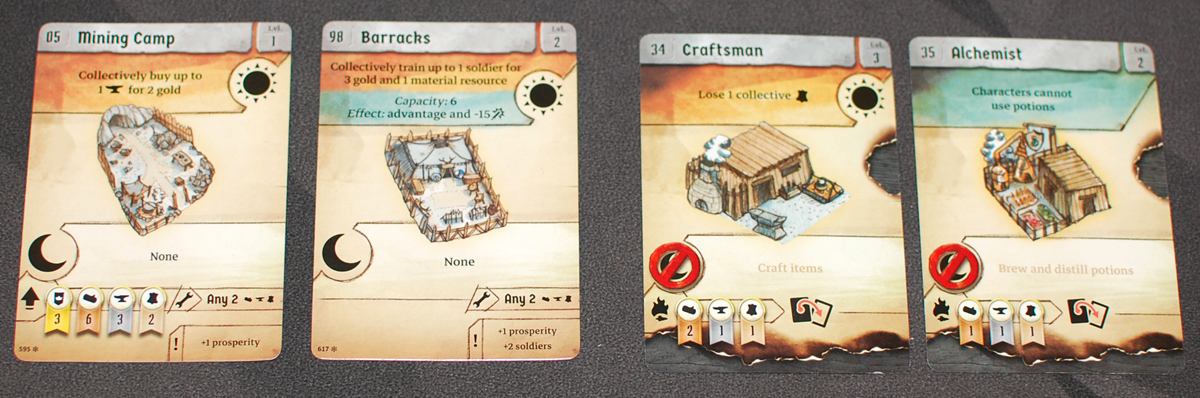

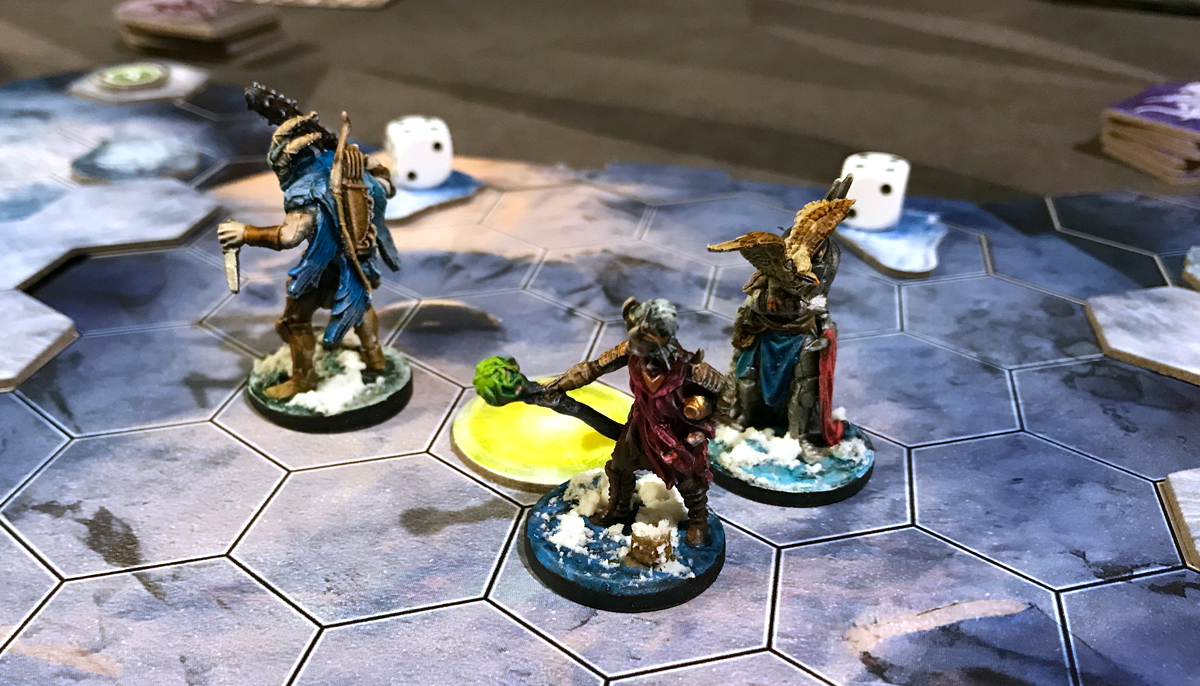


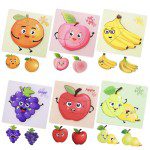

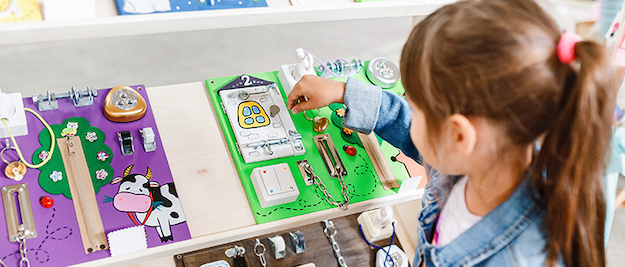

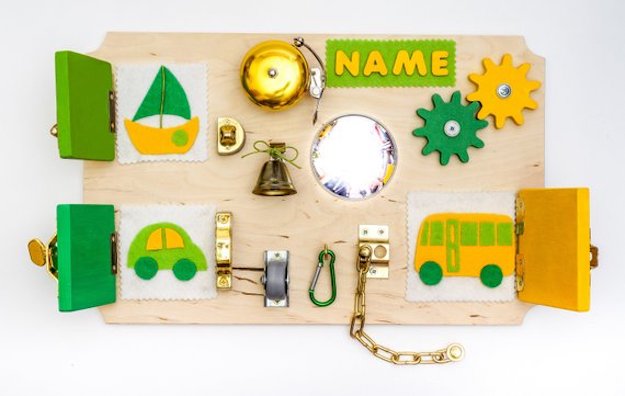


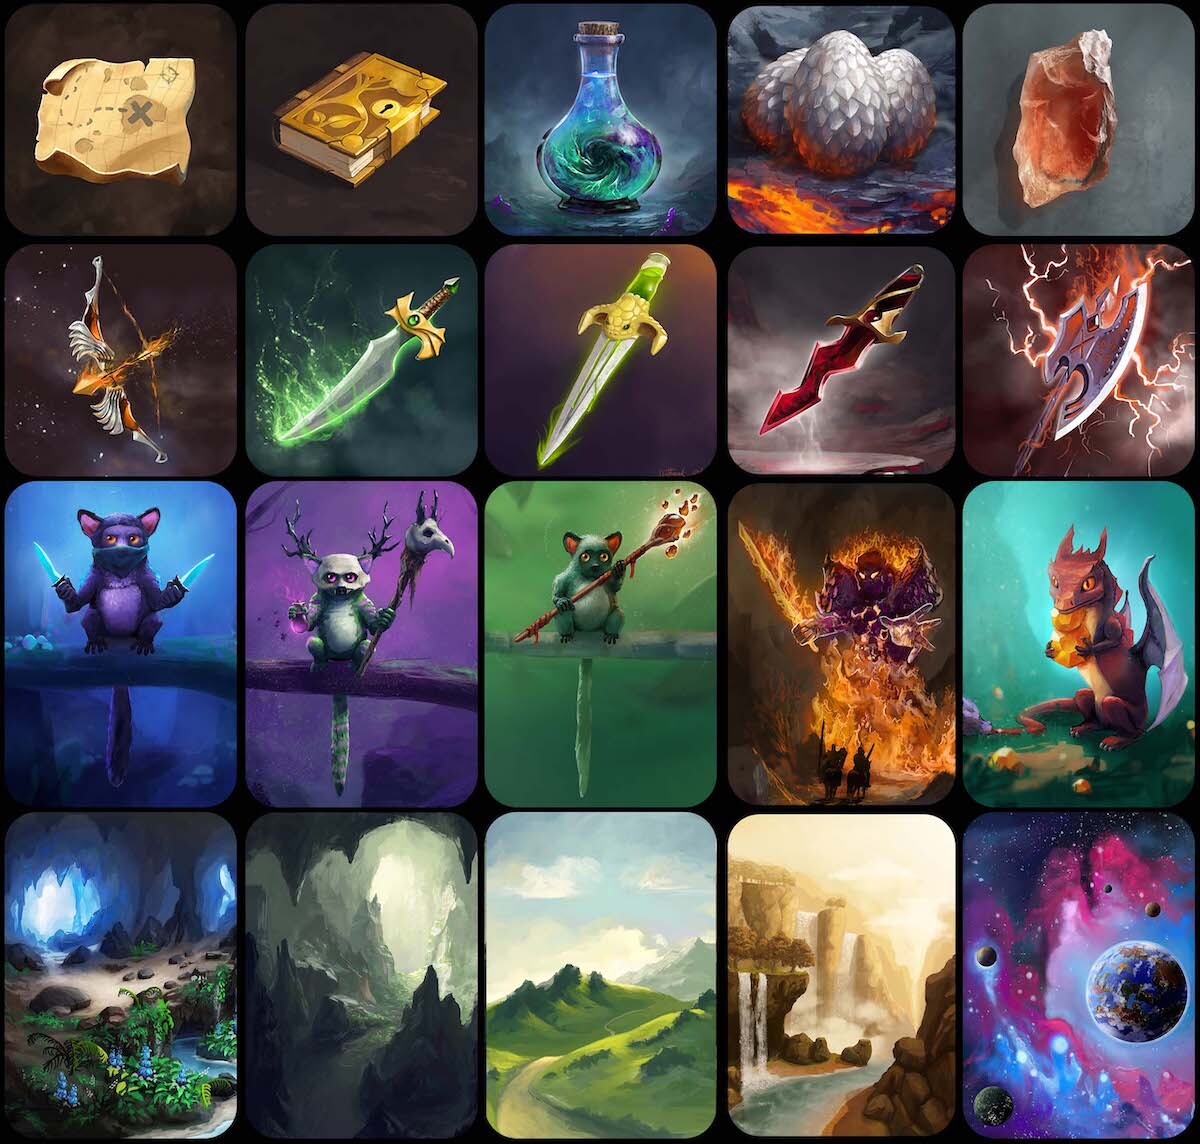
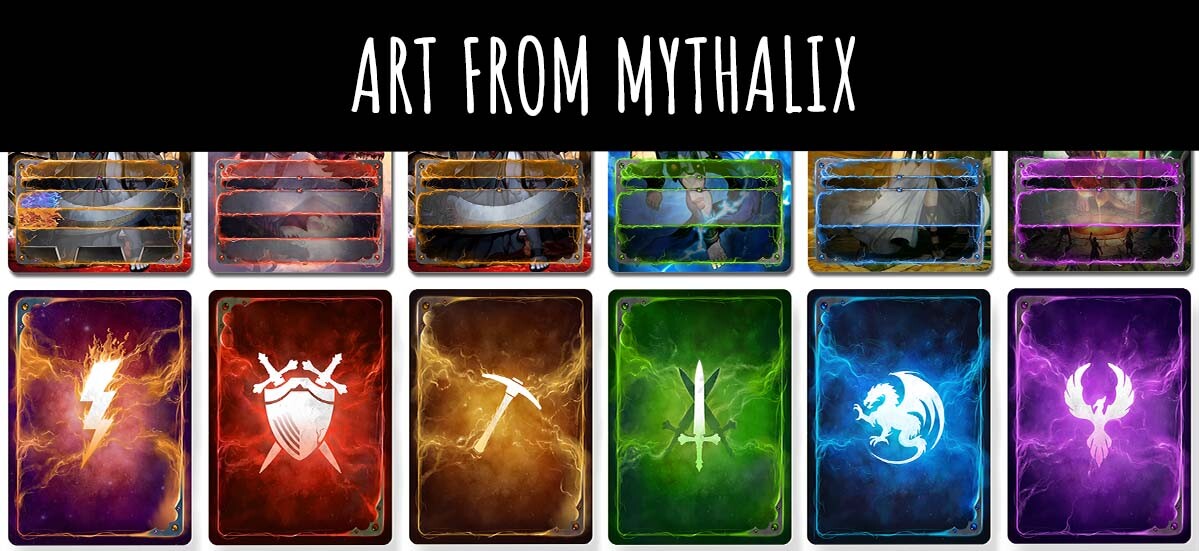

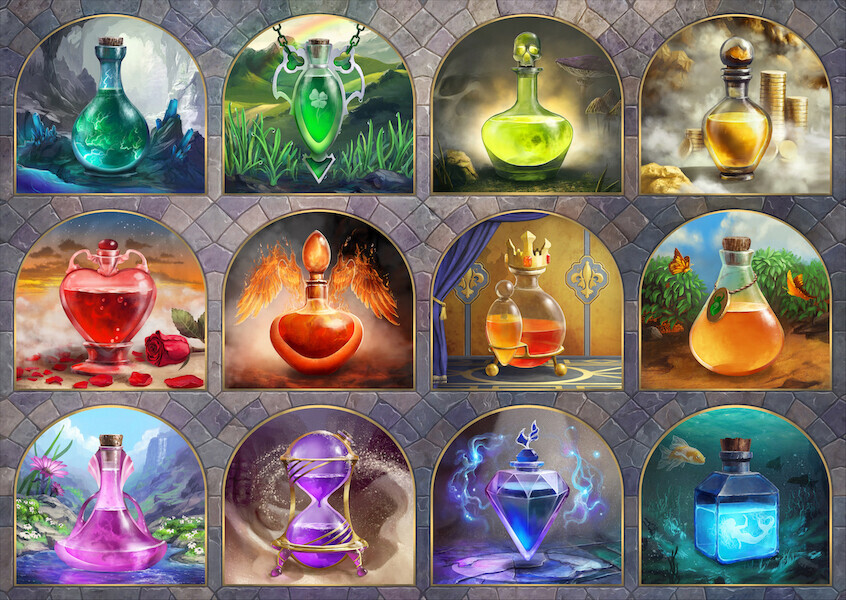
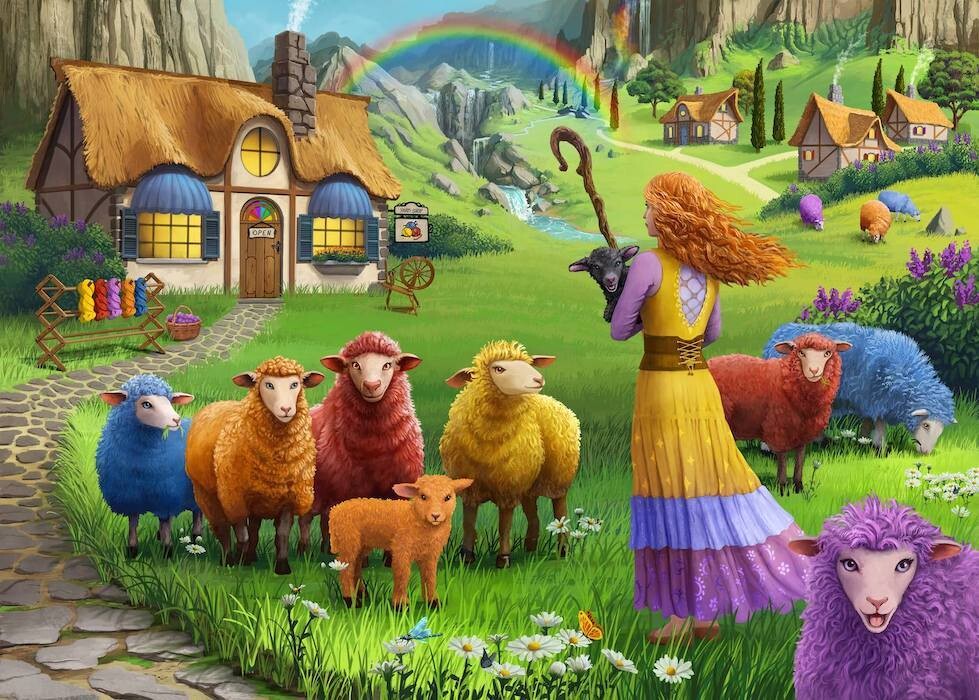


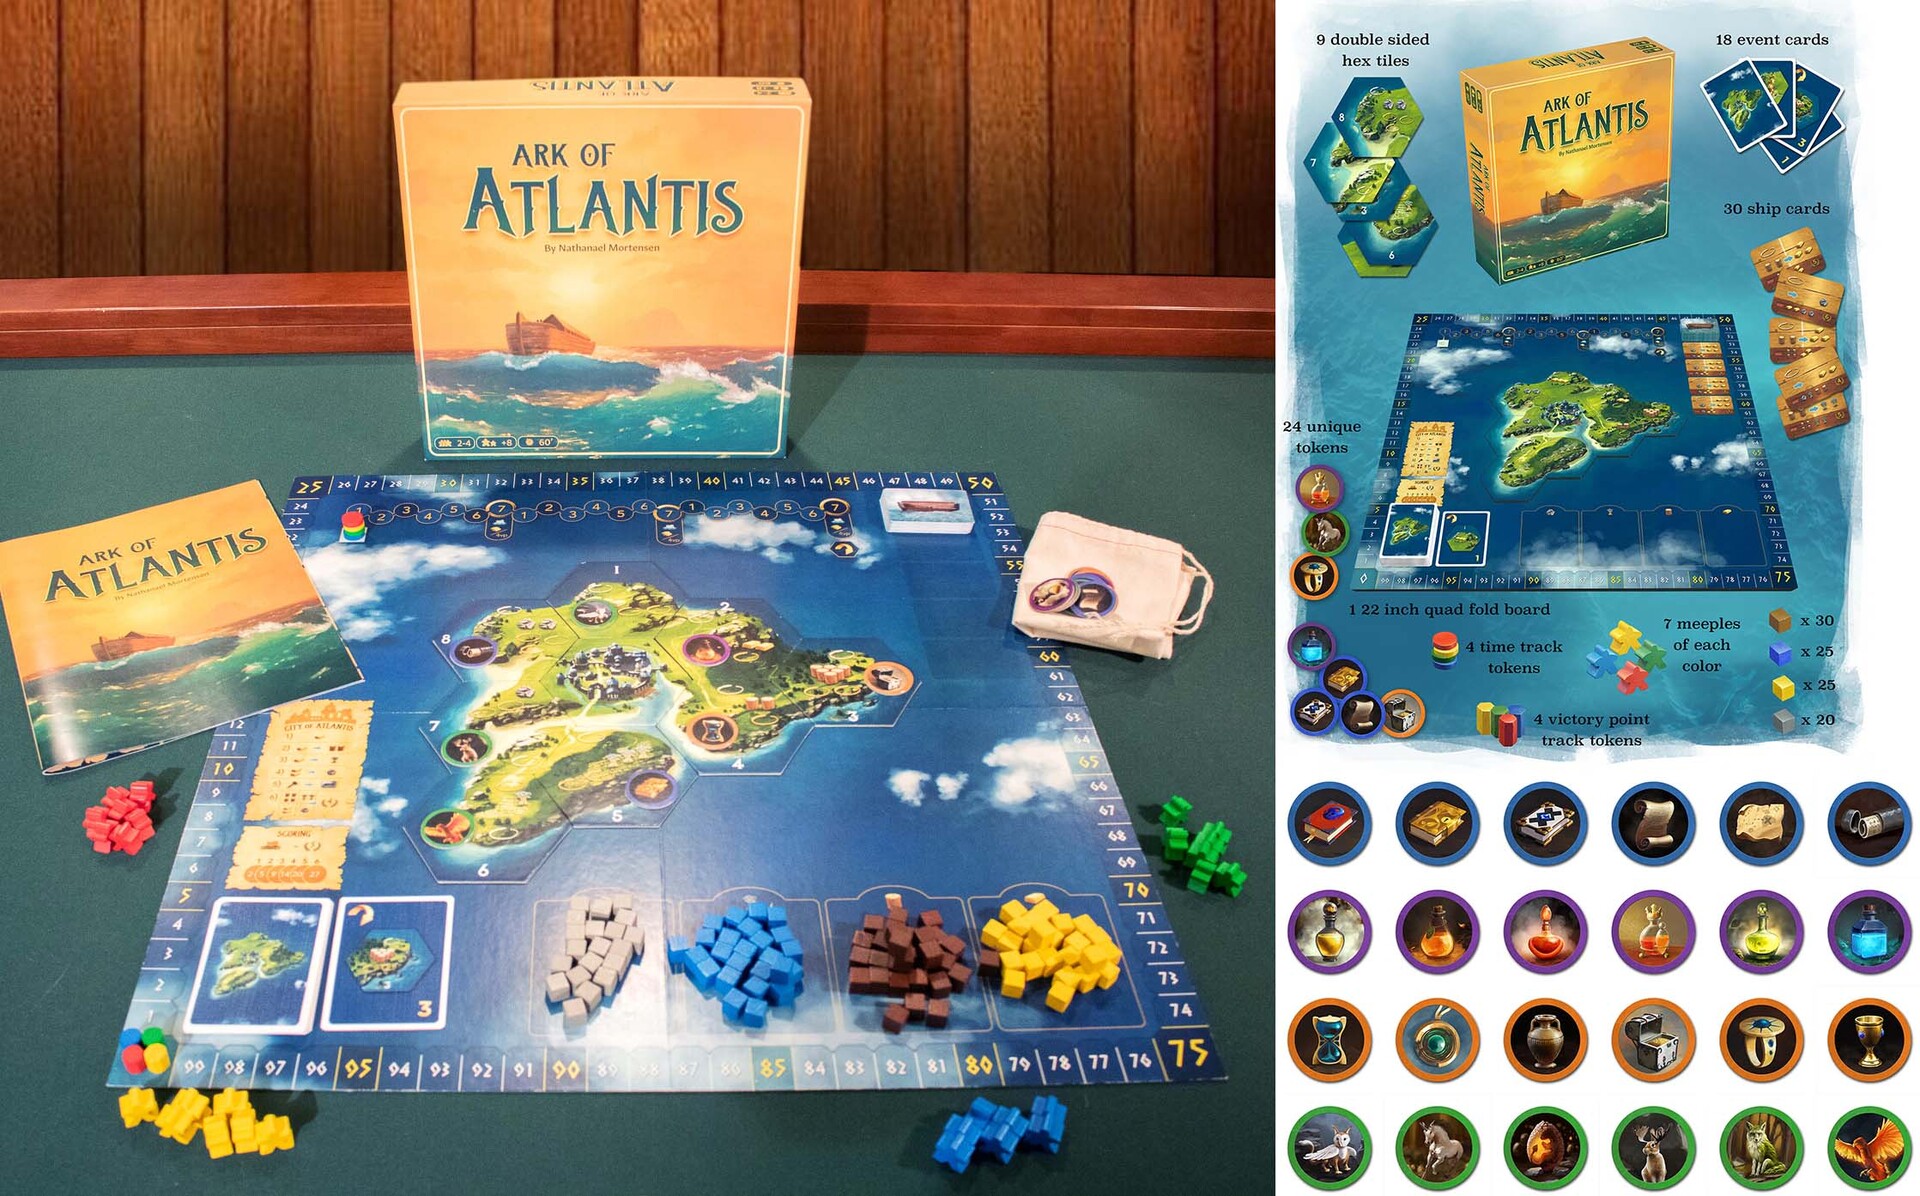


 ]]>
]]>